What You'll Learn
- Read absorption and CVD as supporting evidence rather than a standalone signal.
- Determine whether aggressive participants are making price progress.
- Combine order flow with location, structure, and invalidation.
Advanced Order-Flow & Absorption Confirmation for Elev8 Sweeps
Elev8 sweep reversals can be traded from price structure alone, but experienced traders may add order-flow confirmation to judge whether aggressive activity at the extreme is actually producing continuation. Tools such as CVD divergence, Bookmap, and volume / absorption reads can help you separate failed aggression from clean acceptance, improve timing, and become more selective about which sweeps deserve risk.
Your execution trigger can still come from Elev8+ Pro (levels + triangles/LS), but order-flow becomes more useful when the surrounding structure agrees: Market Map confirms meaningful HTF/session liquidity, Market Extremes / VWAP Deviation show whether price is genuinely extended, and Momentum Gaps / Reversal Blocks / Real FVG show whether displacement and retest structure support reversal or continuation. These tools are optional—use them to add independent information, not to overcomplicate.
The "Lie Detector" Analogy
Think of Price as the final result and order flow as evidence about the effort behind that result.
Price can make a new high while aggressive buying fails to expand proportionally, or aggressive buying can remain strong while price stops advancing.
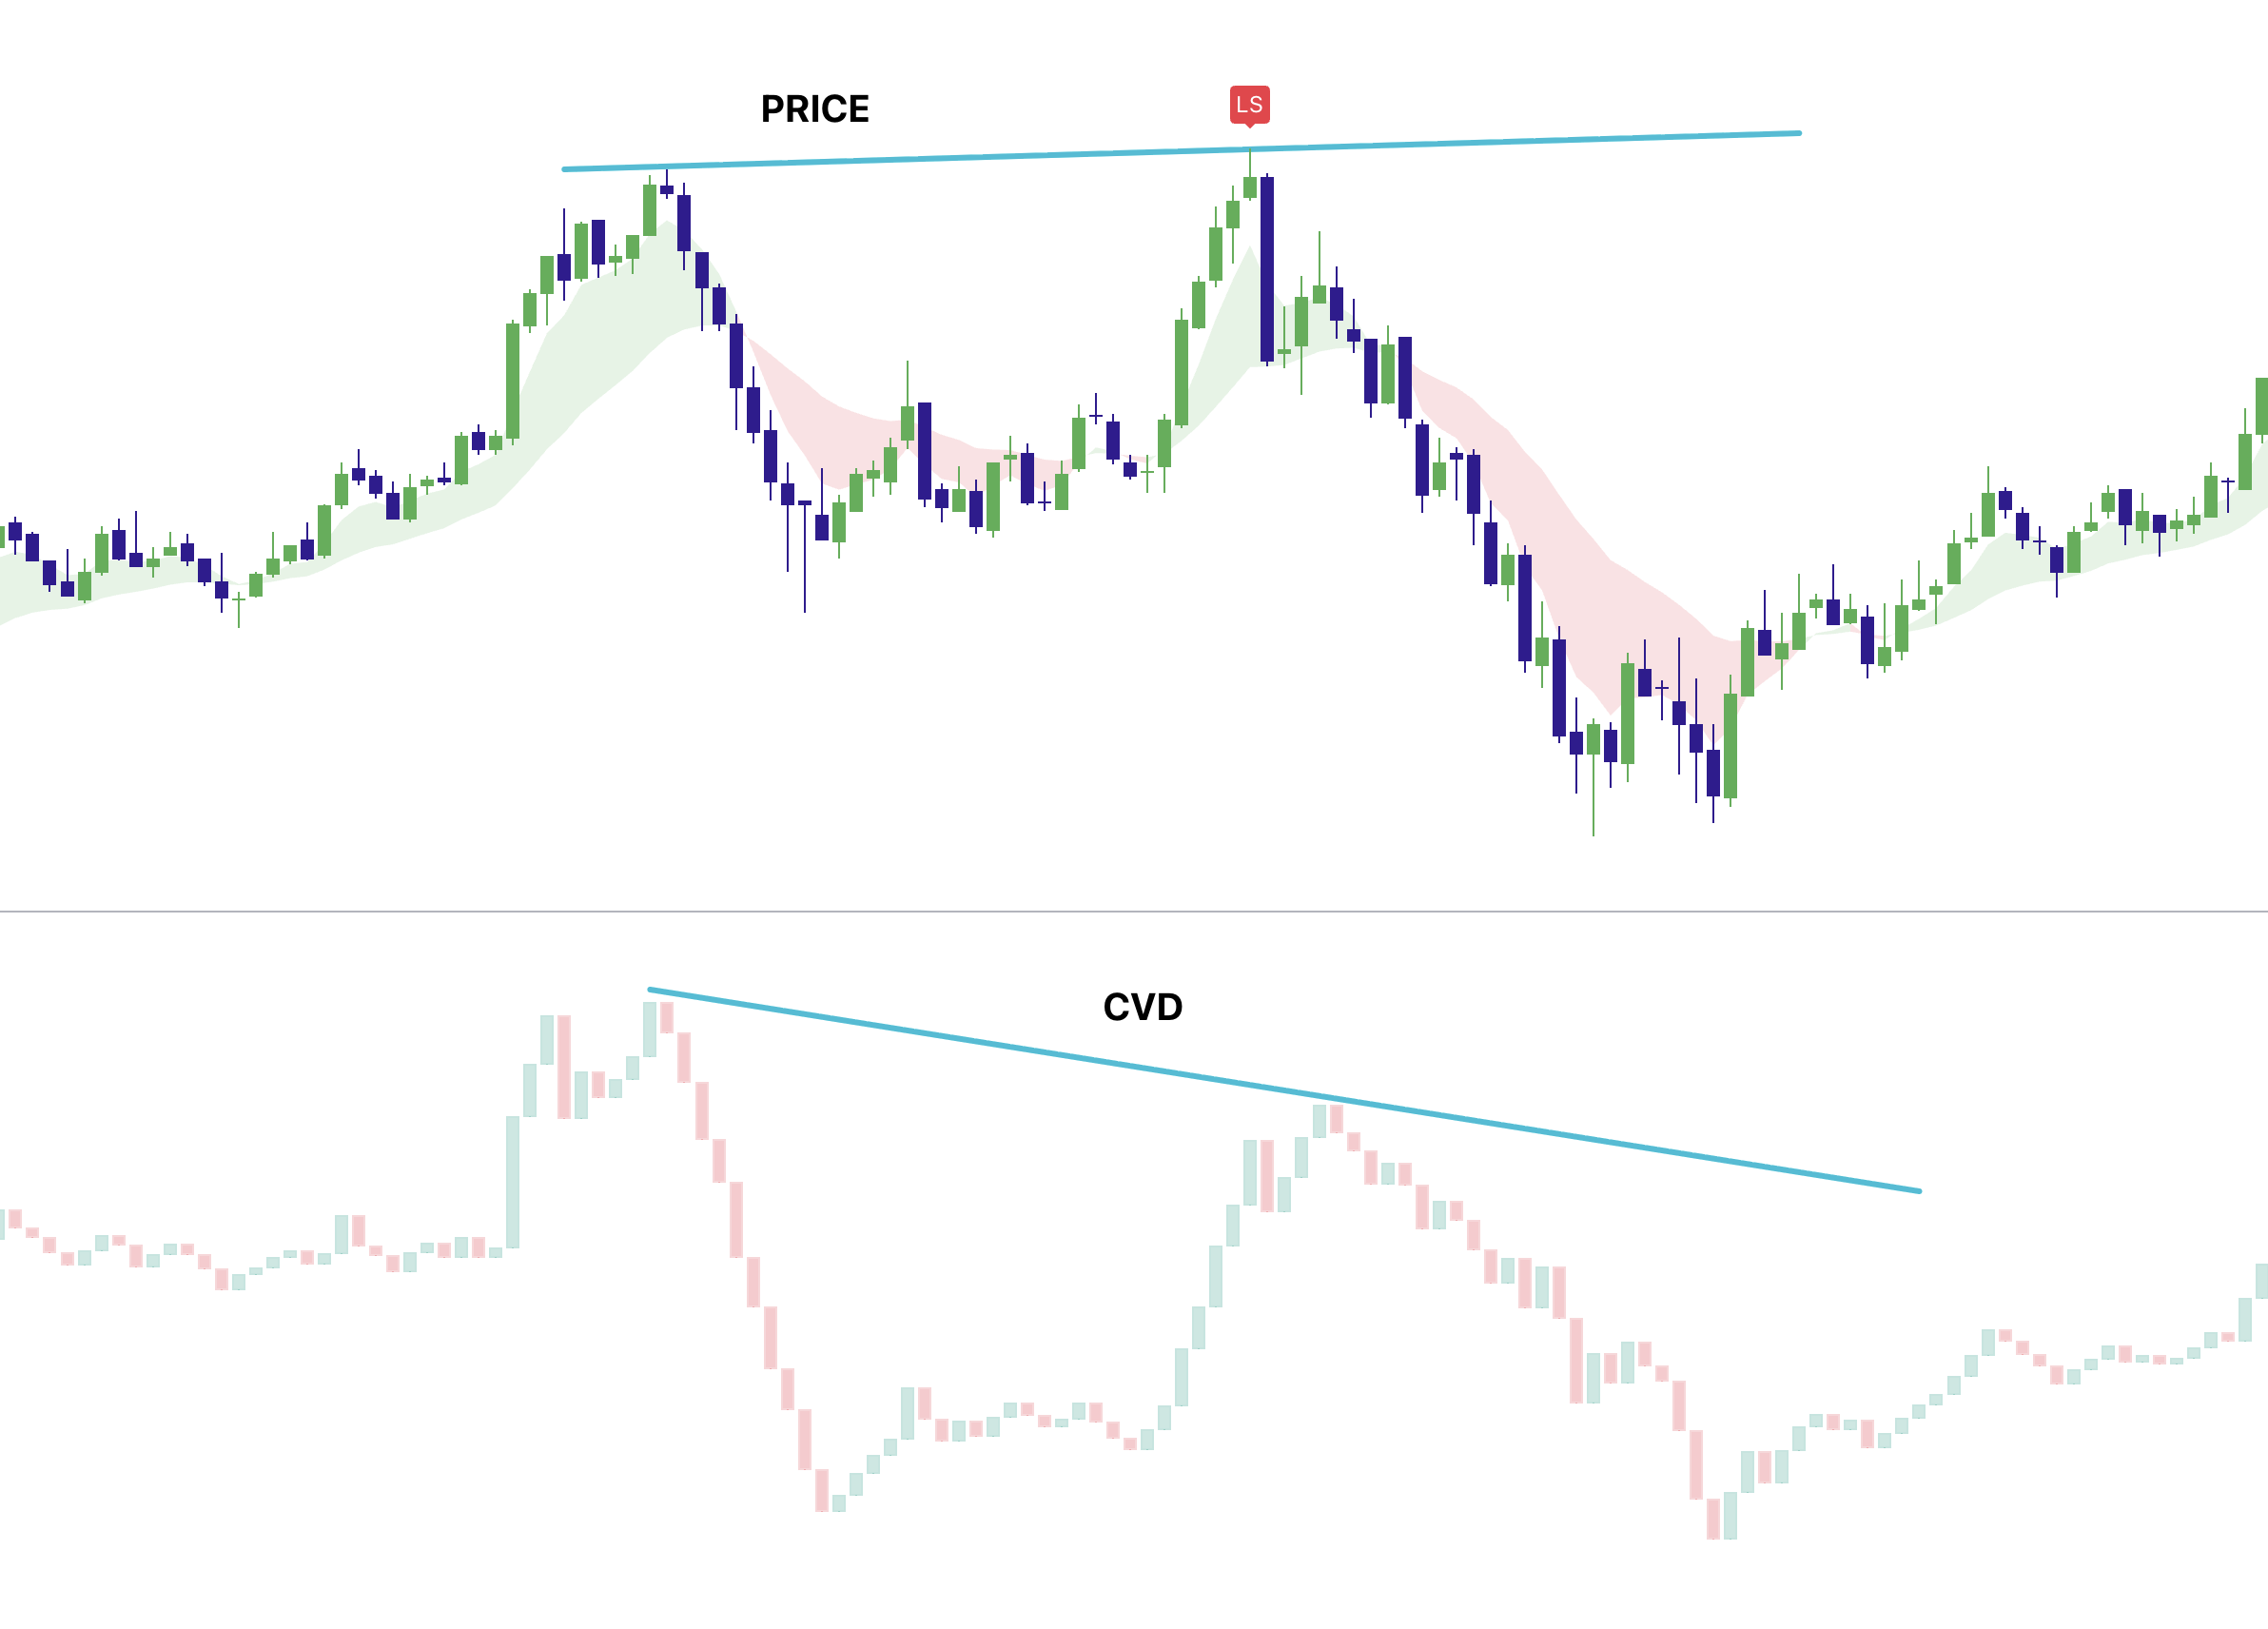
Think of Order Flow (CVD) as evidence about whether aggressive participation is confirming that move. CVD divergence does not prove a breakout is false; Divergence simply tells you price and aggressive participation are no longer confirming each other, which matters most at meaningful liquidity with rejection.
Why Order-Flow Confluence Matters
A liquidity sweep tells you where an important price test occurred. Order flow adds another layer by showing whether aggressive participation is moving price efficiently or being absorbed at the extreme.
- Was aggressive flow absorbed without corresponding price progress?
- Did price begin responding in the opposite direction, or is the breakout simply pausing?
- Does the order-flow evidence support the same rejection / acceptance story shown by structure?
Optional confluence: If Market Map shows the order-flow event is occurring at meaningful HTF/session liquidity rather than a random intraday pivot, the information generally deserves more weight.
Important Note
You do not NEED these tools to trade Elev8+. Price structure remains the primary framework. Order flow is an optional confirmation layer for advanced traders—not an automatic reason to increase risk.
Confirmation Tool 1: CVD Divergence (Participation Mismatch)
CVD (Cumulative Volume Delta) tracks the running difference between aggressive buying and aggressive selling in the data feed you are viewing. During a sweep, divergence can reveal that price expansion and aggressive participation are no longer moving together.
-
Bearish Divergence (Top Sweep):
Price makes a Higher High, but CVD makes a Lower High or otherwise fails to confirm the new price extreme.
Translation: "Price expanded higher without matching improvement in aggressive net buying." -
Bullish Divergence (Bottom Sweep):
Price makes a Lower Low, but CVD makes a Higher Low or otherwise fails to confirm the new price extreme.
Translation: "Price expanded lower without matching deterioration in aggressive net selling."
When Elev8 confirms at meaningful liquidity and CVD diverges while price reclaims / displaces away, the setup gains an additional independent piece of reversal evidence.
Optional confluence: If Market Extremes / VWAP Deviation also show genuine extension, CVD divergence at external liquidity is usually more informative than the same divergence in mid-range chop.
Confirmation Tool 2: Volume Exhaustion (Effort vs. Result)
Standard volume can add useful context when a sweep reaches an important level. The key is not simply “high volume”—it is how much price progress that participation actually produces.
- The Spike: Look for unusually high participation as price trades through or into the liquidity level.
- The Response: If high volume produces little continuation and price reclaims the level, that can support an effort-vs-result / absorption interpretation.
- The Logic: Strong aggressive activity with poor price progress suggests the other side may be absorbing flow—but require subsequent rejection or displacement before treating it as reversal confirmation.
Confirmation Tool 3: Bookmap Absorption (Advanced)
On Bookmap or other depth / execution visualizations, stronger sweep setups may show signs that aggressive market orders are being absorbed near the extreme without producing corresponding price progress.
- Passive Liquidity: Resting liquidity may remain visible or repeatedly refresh near the level while aggressive orders execute into it.
- Aggressive Fail: Large executed volume continues hitting the area but price cannot advance materially; the stronger confirmation comes when price then rejects and begins moving away.
Layering Order-Flow With Elev8 (The Hierarchy)
The strongest Elev8 confluence combines independent evidence from location, structural failure, confirmation, and participation. A practical hierarchy looks like this:
- Meaningful external liquidity (PDH/PDL, session highs/lows, HTF structure) [Most Important]
- Liquidity event + failed continuation through that level
- Reclaim / opposite displacement / structure shift
- Elev8 triangle, LS, or structured RB/FVG retest
- CVD divergence, absorption, or effort-vs-result evidence [Additional Confirmation]
Optional: Use Momentum Gaps / Reversal Blocks / Real FVG to map the rotation path after confirmation. These zones can define retest quality, partial-profit checkpoints, and structural trailing instead of relying only on “feel.”
How to Use Confirmation in Practice
The simplest way to integrate order flow is to let it improve selectivity—not automatically increase size.
- Normal Planned Risk: Meaningful liquidity + reclaim / displacement + valid Elev8 confirmation, even if separate order-flow data is unavailable.
- Higher-Confluence Setup: The same structural setup plus CVD divergence and/or observable absorption; keep risk within your predefined maximum rather than automatically doubling size.
- No Trade: Minor location, no structural failure, or order flow continues confirming the breakout direction.
Summary
- CVD Divergence = Participation mismatch that can support a failed-breakout thesis.
- High Volume + Poor Price Progress = An effort-vs-result clue that may indicate absorption.
- Elev8 + Order Flow = Strongest when location, rejection/acceptance, displacement, and participation tell the same story.
Elev8 can stand on its own as a liquidity and structure framework. When you layer order flow intelligently, it becomes another way to test whether aggression is actually succeeding at the level—or failing where your reversal thesis needs it to fail.
Quick Checklist
- I can read absorption and CVD as supporting evidence rather than a standalone signal.
- I can determine whether aggressive participants are making price progress.
- I can combine order flow with location, structure, and invalidation.
What Invalidates the Setup?
Stand aside when meaningful location, the expected price response, confirmation, clearly defined structural risk, or a realistic target is missing. A tool or signal by itself does not complete the trade thesis.
Common Mistakes
- Counting several correlated indicators as independent confluence.
- Trading a zone before price confirms the expected response.
Next Recommended Lesson
Institutional Liquidity & Macro Sweep Framework for Elev8+ →