What You'll Learn
- Map Asian, London, and New York session liquidity.
- Distinguish rejection from acceptance after a session extreme is breached.
- Use multi-timeframe confirmation without fading genuine breakouts.
Session Sweep Playbook • London + NY Open
How to Trade the London Sweep of the Asian Range (and the NY Sweep of London/Asia) with Elev8+
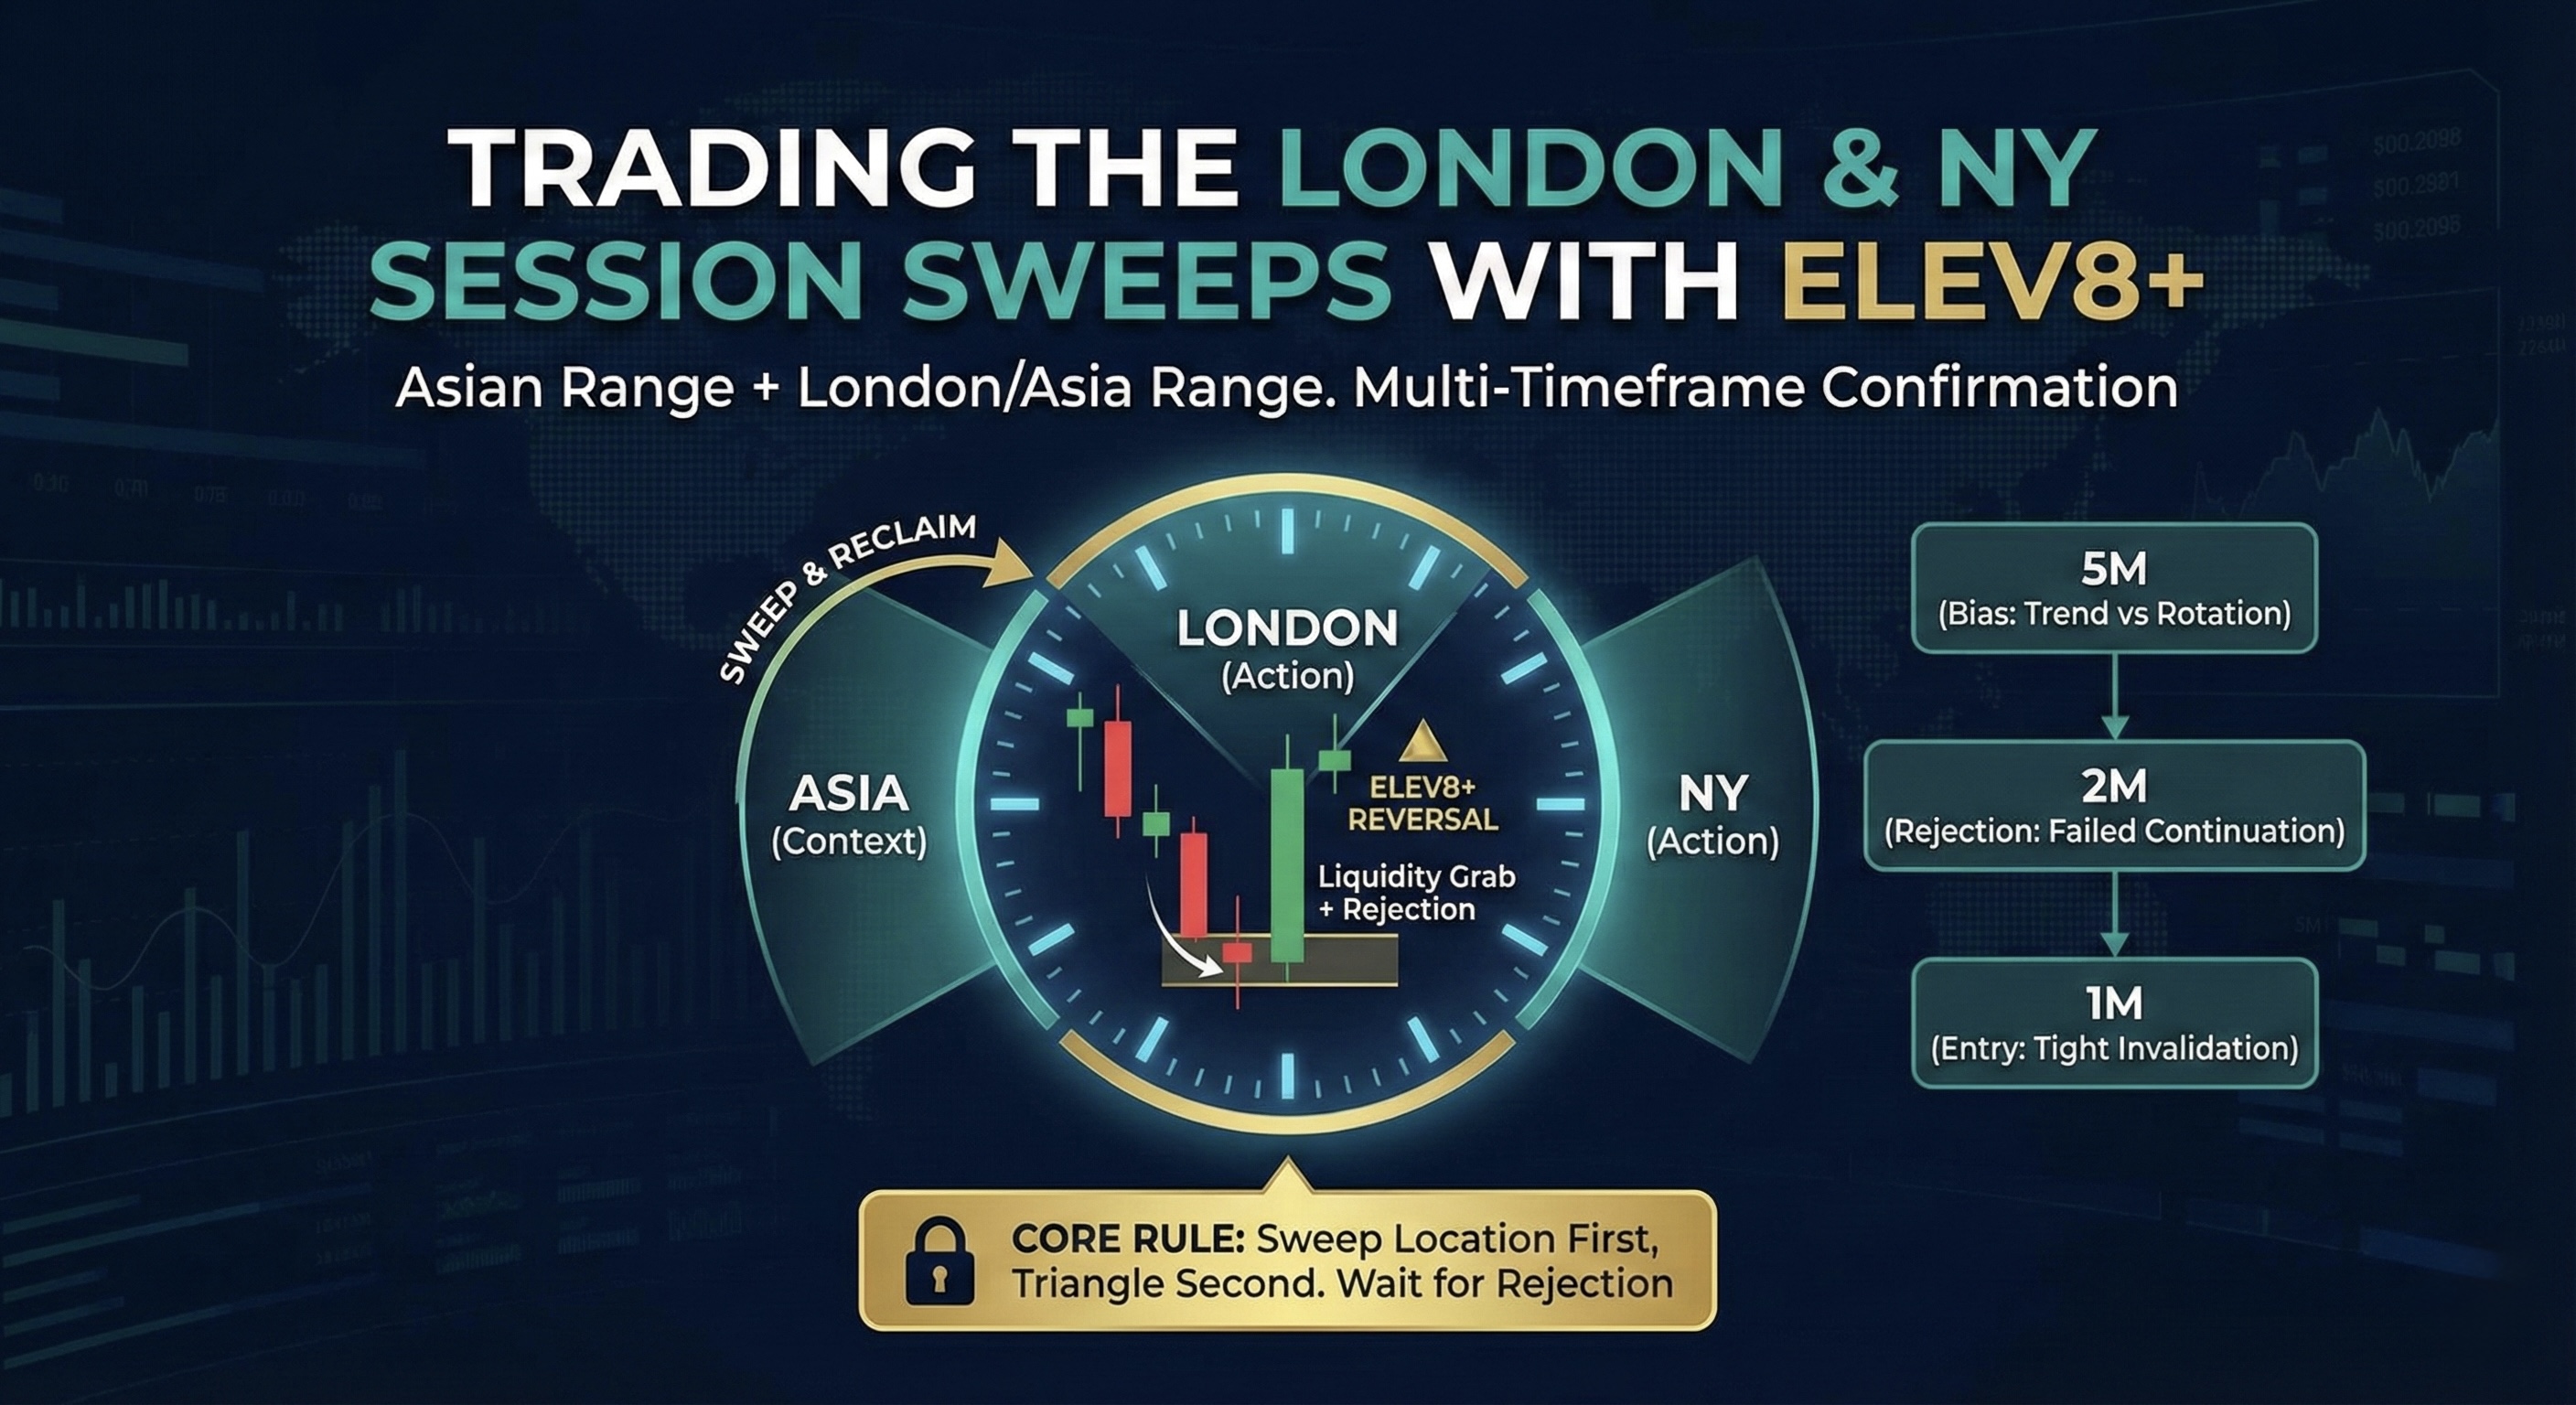
The London open and NY open frequently trade through obvious prior-session highs/lows where stops and breakout orders are clustered, then either fail back into the prior range or establish acceptance beyond it. This guide shows how to use Elev8+ Pro reversal triangles/LS and liquidity sweep context inside a more complete multi-timeframe process (5m → 2m → 1m) built around reclaim, displacement, structure, and defined invalidation—without fading real continuation.
Suite context
You can trade this playbook with Elev8+ Pro alone, but the full suite gives each decision a clearer job: Market Map defines meaningful session liquidity and nearby objectives, Market Extremes shows whether price is genuinely stretched or still trading normally, and Momentum Gaps helps identify displacement, imbalance, and the structure created after the sweep. Reversal Blocks and Real FVGs can further refine the retest location.
Educational content only. Not financial advice. No performance guarantees.
Core idea
A sweep is the setup location—not the entry. The reversal strengthens when price runs stops at a meaningful session extreme, then reclaims, displaces away, and begins breaking the sweep leg’s structure.
Multi-TF process
Use 5m for broader session context, 2m for rejection vs acceptance, and 1m for execution and precise invalidation. The same top-down logic can be adapted to other timeframe combinations without changing the underlying setup.
Big filter
Don’t fade if price accepts outside the range through repeated closes, displacement, and a successful level flip. At that point the better play may be continuation, not reversal.
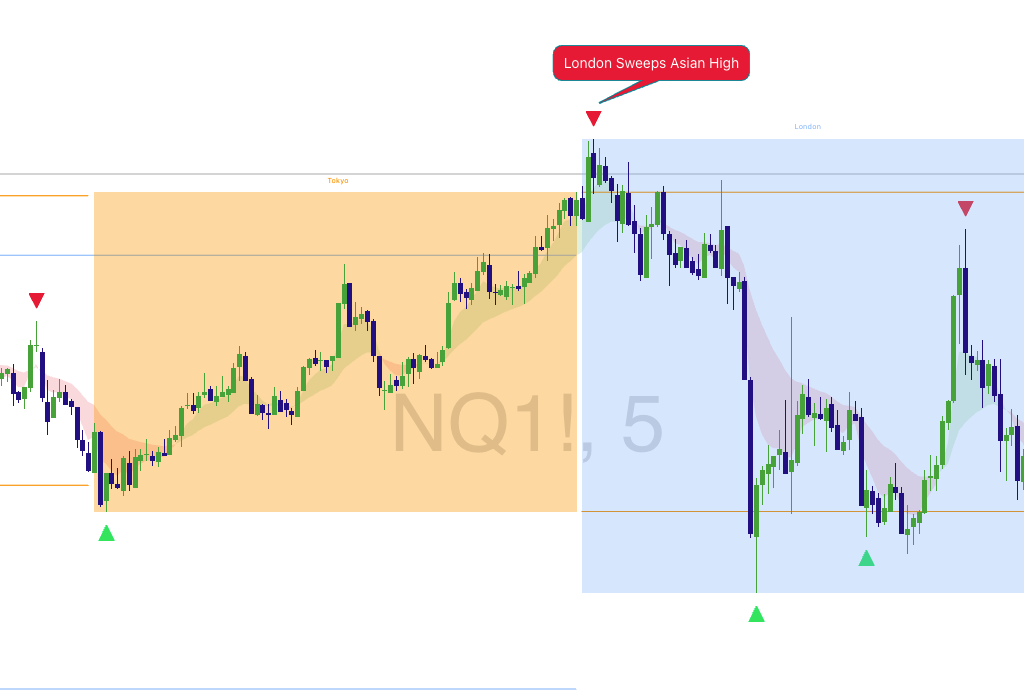
Example 1: London sweeps the Asian high (NQ • 5m)
Why London and NY Sweeps Happen (and Why They Matter)
Session ranges (especially Asia and London) form clean, obvious highs and lows. Those boundaries attract liquidity because stops, breakout entries, and resting orders often cluster around them. When London opens—or when NY cash session approaches— price may trade through one of those levels, trigger the orders around it, and then show one of two very different behaviors:
- Reject back inside the prior range (sweep-and-reverse), or
- Accept outside the range and continue (true breakout / continuation).
The best mindset
Elev8+ is most effective when you treat triangles as triggers inside a liquidity story—not as random buy/sell signals. Use the suite to separate the jobs: Map defines the external liquidity, Extremes shows extension, and Gaps helps confirm displacement and map the structure produced after rejection.
The Two Setups You’re Targeting
1) London Sweep of the Asian Range
- Level: Asian session high/low (the range boundary).
- Event: London probes beyond the boundary (liquidity grab / stop run).
- Edge: rejection + reclaim becomes much stronger when followed by opposite displacement and a structural response away from the swept level.
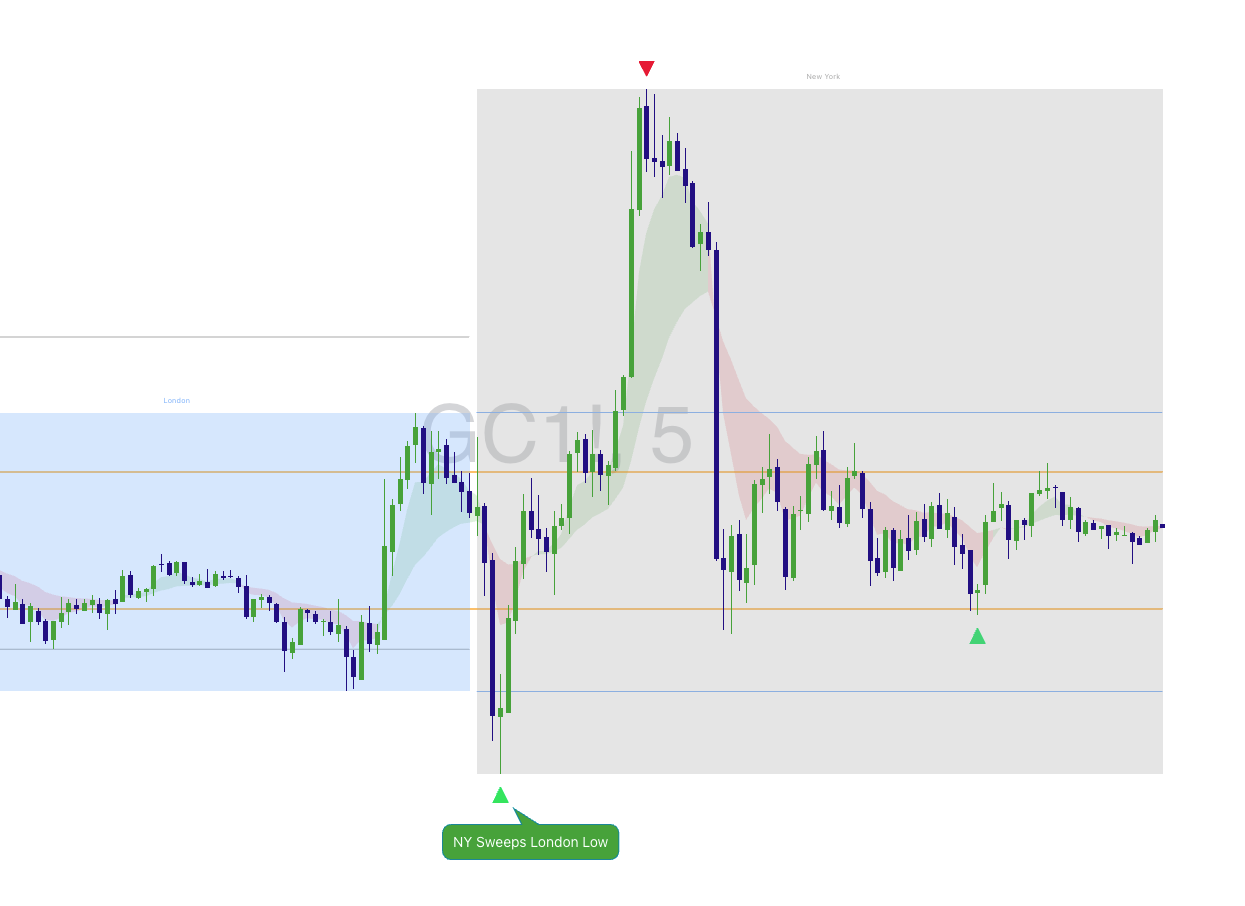
2) NY Sweep of the London/Asia Range (Around Market Open)
- Level: London high/low and/or combined London+Asia extremes.
- Event: NY open often sweeps remaining liquidity before choosing direction.
- Edge: the first clean reclaim can become a strong reversal candidate when NY also produces displacement, structure shift, and a defendable retest area.
Example 2: NY sweeps the London low (Gold • 5m)
The Core Rule: Sweep Location First, Triangle Second
The triangle is most valuable when it prints at/near a meaningful sweep location (prior session high/low), and price has already shown evidence of rejection. The strongest sequence is liquidity first, then failure, displacement, structure, and finally execution. Prioritize signals that meet these conditions:
- At or just beyond Asia/London highs/lows where meaningful external liquidity is clearly defined.
- After a clear sweep followed by failure to continue through the level.
- With reclaim, opposite displacement, or a micro structure break showing that control is beginning to shift.
Optional suite filter (fast)
• Market Map: is this a meaningful external-liquidity level, or just a minor intraday swing?
• Market Extremes: is price stretched enough for a reversal thesis to make sense?
• Momentum Gaps: did the rejection create real displacement, imbalance, or a clean retest structure?
• Elev8+ Pro: does the triangle/LS confirm the setup after the location and reaction are already valid?
Multi-Timeframe Confirmation: 5m Context, 2m Reaction, 1m Execution
Step 1: 5m = Context (Are We Trending, Extended, or Rotating?)
- Mark Asia high/low, London high/low, and the next meaningful external-liquidity objective.
- Determine whether price is trending cleanly, rotating inside a range, or arriving extended into a session boundary.
- If 5m is showing strong acceptance and directional displacement, require substantially stronger evidence before fading.
Optional: Use Market Extremes here to separate true extension from ordinary trend movement. The best reversal candidates combine a meaningful liquidity event with an actual reason for continuation to fail.
Step 2: 2m = Rejection vs Acceptance (Is Control Actually Shifting?)
On 2m, you want evidence that the sweep is failing rather than simply pausing outside the level:
- Close back inside the range or decisively reclaim the swept level.
- Failed continuation followed by displacement in the opposite direction.
- Micro structure shift: the sweep leg stops making progress and a meaningful internal swing is broken.
Optional: If Momentum Gaps shows continued displacement through the level with fresh same-direction inefficiencies and no meaningful reclaim, treat that as acceptance behavior. If rejection creates a fresh RB/FVG, the later retest can offer the cleaner entry.
Step 3: 1m = Entry Timing (Choose Aggressive Confirmation or the Retest)
- Use 1m to time an early entry after reclaim + displacement, or wait for a retest of the fresh RB/FVG created by the reversal.
- Define invalidation beyond the structure whose failure would prove the reversal thesis wrong.
- Avoid chasing triangles after price has already rotated far from the sweep or when no liquidity story exists.
Optional: Use Market Map (session liquidity / next objectives) and Momentum Gaps (RB/FVG and displacement checkpoints) to plan both the entry location and target path before execution.
Example 3: 1m execution after a NY sweep (Gold • 1m)
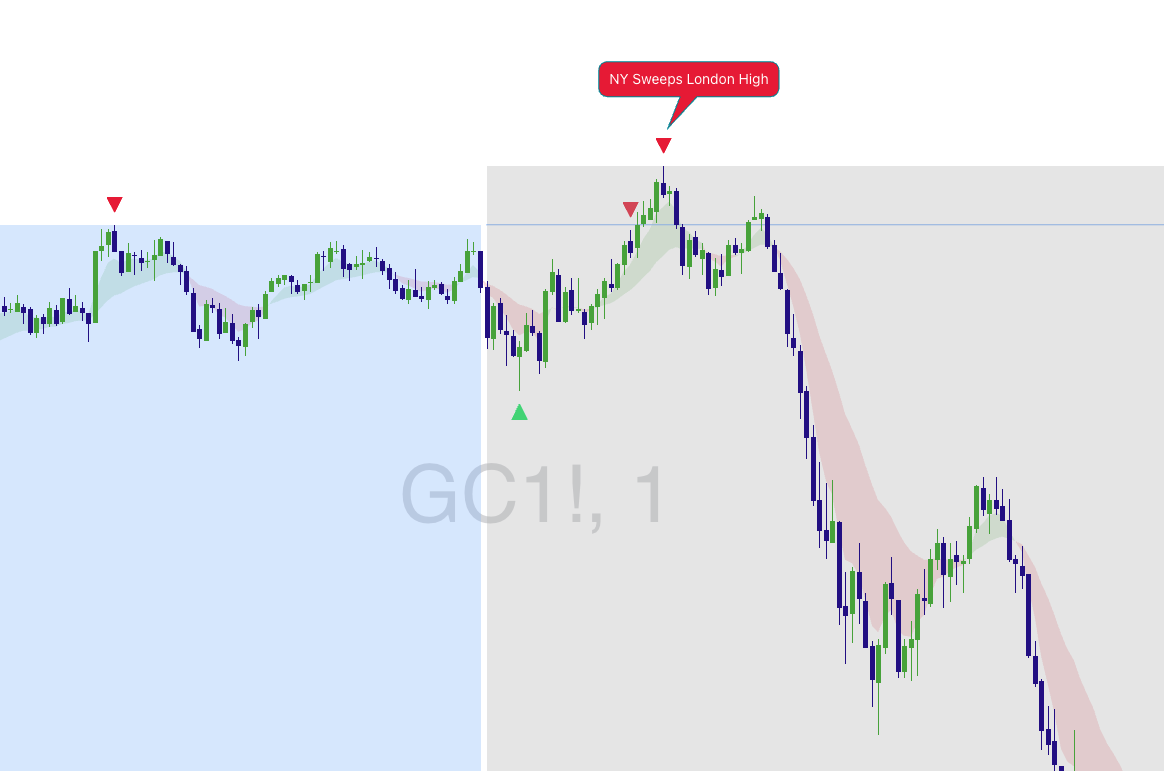
Rejection Checklist (use this before entering)
• A meaningful prior-session high/low or external-liquidity level was clearly swept.
• Price reclaims the level and fails to continue in the sweep direction.
• Opposite displacement / micro structure shift confirms that control is changing.
• Invalidation is clear beyond the structure that defines the setup.
• 5m is not showing clean acceptance and continuation through the level.
• The triangle/LS appears at the setup location or on the structured retest—not after the move is extended.
• Market Extremes supports extension, divergence, or exhaustion at the liquidity event.
• Momentum Gaps / RB / Real FVG gives a clean retest area or rotation path after displacement.
If you cannot define invalidation, you do not have a clean sweep trade—only a guess.
How to Avoid Fading a Real Breakout (When the Sweep Becomes Continuation)
Not every trade through a session extreme is a failed breakout. Sometimes price removes the liquidity and then establishes a new auction outside the range. Your job is to identify acceptance behavior early and switch from reversal thinking to continuation thinking.
Breakout / Acceptance Warning Signs
- Multiple closes outside the range with little ability to reclaim the old boundary.
- Pullback holds the swept level as support/resistance, confirming a successful level flip.
- Fresh displacement / imbalance keeps forming in the breakout direction instead of being immediately retraced.
- Momentum persists: continuation candles keep expanding and corrective pullbacks remain shallow.
Sweep Decision Tree (simple)
Step 1: Did price trade through a meaningful session extreme / external-liquidity level?
Step 2: Did it reclaim and produce opposite displacement / structure failure?
If YES: look for the confirmation entry or the fresh RB/FVG retest with defined invalidation.
If NO: treat it as acceptance/breakout risk and look for continuation rather than forcing the fade.
Stops and Targets (Keep It Objective)
Invalidation (Stop Loss)
- Short after sweep-high rejection: invalidate beyond the sweep / rejection structure that must hold for the bearish thesis to remain valid.
- Long after sweep-low rejection: invalidate beyond the sweep / rejection structure that must hold for the bullish thesis to remain valid.
Targets (Range Logic)
- First target: nearest internal liquidity, prior micro swing, or first clean reaction objective.
- Second target: session midpoint / VWAP / prior consolidation or another mapped structural level.
- Runner: opposing external liquidity or the far side of the session range if displacement and follow-through remain strong.
Optional: Use Market Map for the next liquidity objectives and Momentum Gaps for structural checkpoints. A mean-reversion target only makes sense while the reversal continues proving itself.
Common Mistakes (and the Fix)
- Mistake: taking triangles mid-range with no external-liquidity event. Fix: make location and liquidity the first filter.
- Mistake: fading strong 5m acceptance. Fix: require reclaim, opposite displacement, and structural failure before fighting the move.
- Mistake: using a fixed wide stop because a sweep occurred. Fix: place risk beyond the structure that actually invalidates the thesis.
- Mistake: entering on first touch. Fix: let the sweep prove failure, then choose the confirmation entry or structured retest.
Want to see sweep setups on real charts?
Use Elev8+ to map meaningful session liquidity, identify the sweep, and then judge reclaim, displacement, structure, and acceptance before execution. The goal is not to fade every stop run—it is to trade the sweeps that actually prove failure and avoid fighting the ones that become real breakouts.
Indicators and examples are for education only. Always define risk and trade only what fits your plan.
Quick Checklist
- I can map Asian, London, and New York session liquidity.
- I can distinguish rejection from acceptance after a session extreme is breached.
- I can use multi-timeframe confirmation without fading genuine breakouts.
What Invalidates the Setup?
Stand aside when meaningful location, the expected price response, confirmation, clearly defined structural risk, or a realistic target is missing. A tool or signal by itself does not complete the trade thesis.
Common Mistakes
- Counting several correlated indicators as independent confluence.
- Trading a zone before price confirms the expected response.
Next Recommended Lesson
Advanced Order-Flow & Absorption Confirmation for Elev8+ Sweeps →