
What You'll Learn
- Explain how a validated Reversal Block and its CE midpoint form.
- Evaluate displacement, liquidity, and first-retest quality at a block.
- Define confirmation and invalidation before trading an RB reaction.
New Release • Reversal Zones + CE Entries + Displacement
Elev8+ Reversal Blocks: Find High-Quality Reaction Zones Before Price Gets There
Good entries are rarely about finding another buy or sell signal. They are about knowing where price has a reason to react. Elev8+ Reversal Blocks identifies validated bullish and bearish zones created around important price extremes, then extends those areas forward so you can prepare for the retest instead of chasing price after the move already happened.
Reversal Blocks can be used for both trend pullbacks and larger reversal setups. The highest-quality opportunities usually occur when an RB also aligns with liquidity, displacement, multiple timeframes, divergence, exhaustion, or another Elev8+ context tool.
Educational content only. Not financial advice. No performance guarantees.
Core idea
Strong reactions often begin from areas where price previously rejected and displaced away. Reversal Blocks preserve those areas so you can watch what happens when price returns.
The entry
The CE midpoint is the primary reaction level. Wait for price to retrace into the RB and show rejection, divergence, exhaustion, or another confirmation before entering.
Strongest setup
Prioritize RBs that overlap across multiple timeframes or sit at meaningful liquidity such as PDH/PDL, Asia/London highs and lows, previous swing levels, or other major structure.
Example 1: Full Reversal Blocks overlay with bullish, bearish, and CE levels

What Is a Reversal Block?
A Reversal Block is a price zone created around a candle that formed at a meaningful local extreme and was later validated by price moving decisively away from that area.
In simple terms, Elev8+ Reversal Blocks asks:
The question
“Where did price previously turn, prove the reaction with displacement, and leave behind an area that may matter again?”
Those areas can become future support or resistance when price comes back. That makes the indicator especially useful for traders who want to plan a retracement before price reaches the entry area.
How Elev8+ Reversal Blocks Finds a Zone
Reversal Blocks are intentionally more selective than simply marking every swing candle. The indicator first identifies a potential bullish or bearish structure candidate around a local extreme.
- Bullish RB candidate: forms around a bearish candle making a local low.
- Bearish RB candidate: forms around a bullish candle making a local high.
The candle must also meet the minimum size requirement. By default, the candidate candle must have a total range of at least 0.60 ATR.
The important part: the zone still has to prove itself
Finding the candle is only the beginning. Elev8+ does not immediately assume that every local high or low is important.
By default, price must move far enough away from the candidate to confirm that meaningful displacement actually occurred.
The default displacement requirement is the greater of:
- 2.0 ATR, or
- 40 minimum ticks.
This helps remove many minor swing points where price turned briefly but never generated a meaningful move.
Important: RBs are validated zones
The original candle happens first. The indicator then waits for the required confirmation and displacement. Once validated, the Reversal Block is drawn from its original location and extended forward. This means the RB should be treated as a future retest zone, not as an entry signal on the original candle.
Example 2: RB origin → displacement → validated reaction zone

What Is CE?
Every Reversal Block includes a CE midpoint. CE stands for Consequent Encroachment and is simply the 50% level of the Reversal Block.
If the zone extends from its low to its high, CE is exactly halfway between those two prices.
The practical rule
RB = the reaction area.
CE = the preferred price inside the area.
Rejection / divergence / exhaustion = confirmation.
Why CE matters
Entering immediately at the outside edge of every RB can create too many premature trades. Waiting for price to trade deeper toward CE allows the market to test more of the zone before you commit.
CE can also give you cleaner risk because the invalidation point is usually obvious: the opposite side of the Reversal Block.
Example 3: CE retest produces a clean reaction

The Right Way to Trade Reversal Blocks
Reversal Blocks are not automatic buy and sell signals. They are location tools.
The highest-quality setups generally combine three separate pieces:
- Location: a valid Reversal Block at meaningful structure.
- Reason: displacement, liquidity sweep, HTF alignment, extension, or multiple-timeframe overlap.
- Trigger: rejection, divergence, exhaustion, order-flow confirmation, or another Elev8+ entry signal.
The rule
Reversal Block = where. CE = preferred entry location. Confirmation = when. The goal is to trade the reaction from a meaningful area—not to blindly buy green boxes or sell red boxes.
What Makes One Reversal Block Stronger Than Another?
Not every RB should be treated equally. The more independent reasons you have for price to react from the same area, the more interesting that zone becomes.
1) Strong displacement away from the zone
A Reversal Block that produced a decisive move away is generally more meaningful than one created during slow, overlapping price action.
Think of displacement as evidence that the market strongly rejected that price area. If price moved away quickly and broke nearby structure in the process, the zone has a much better story behind it.
2) Multi-Timeframe RB Overlap
One of the strongest forms of Reversal Block confluence is when approximately the same price area produces RB structure on more than one timeframe.
For example:
- a 1-minute bullish RB sits inside a 5-minute bullish RB,
- a 5-minute RB overlaps the CE of a 15-minute RB,
- or several timeframes identify almost the same reaction area.
In those situations, multiple levels of market structure are pointing toward the same location.
Important timeframe note
Reversal Blocks are calculated from the timeframe on which the indicator is running. Multi-timeframe overlap is therefore a confluence technique: compare the same area across your execution and higher-timeframe charts and prioritize the zones that line up.
3) Liquidity Sweep Confluence
Reversal Blocks become especially useful when they form around a location where the market just swept obvious liquidity.
High-value examples include:
- Previous Day High / Previous Day Low (PDH / PDL)
- Asia High / Asia Low
- London High / London Low
- Previous Week High / Low
- Previous 4H or 1H swing levels
- Equal highs / equal lows
- Major protected intraday swing highs or lows
A sweep gives the reversal a reason. The RB then gives you a location to trade the retracement.
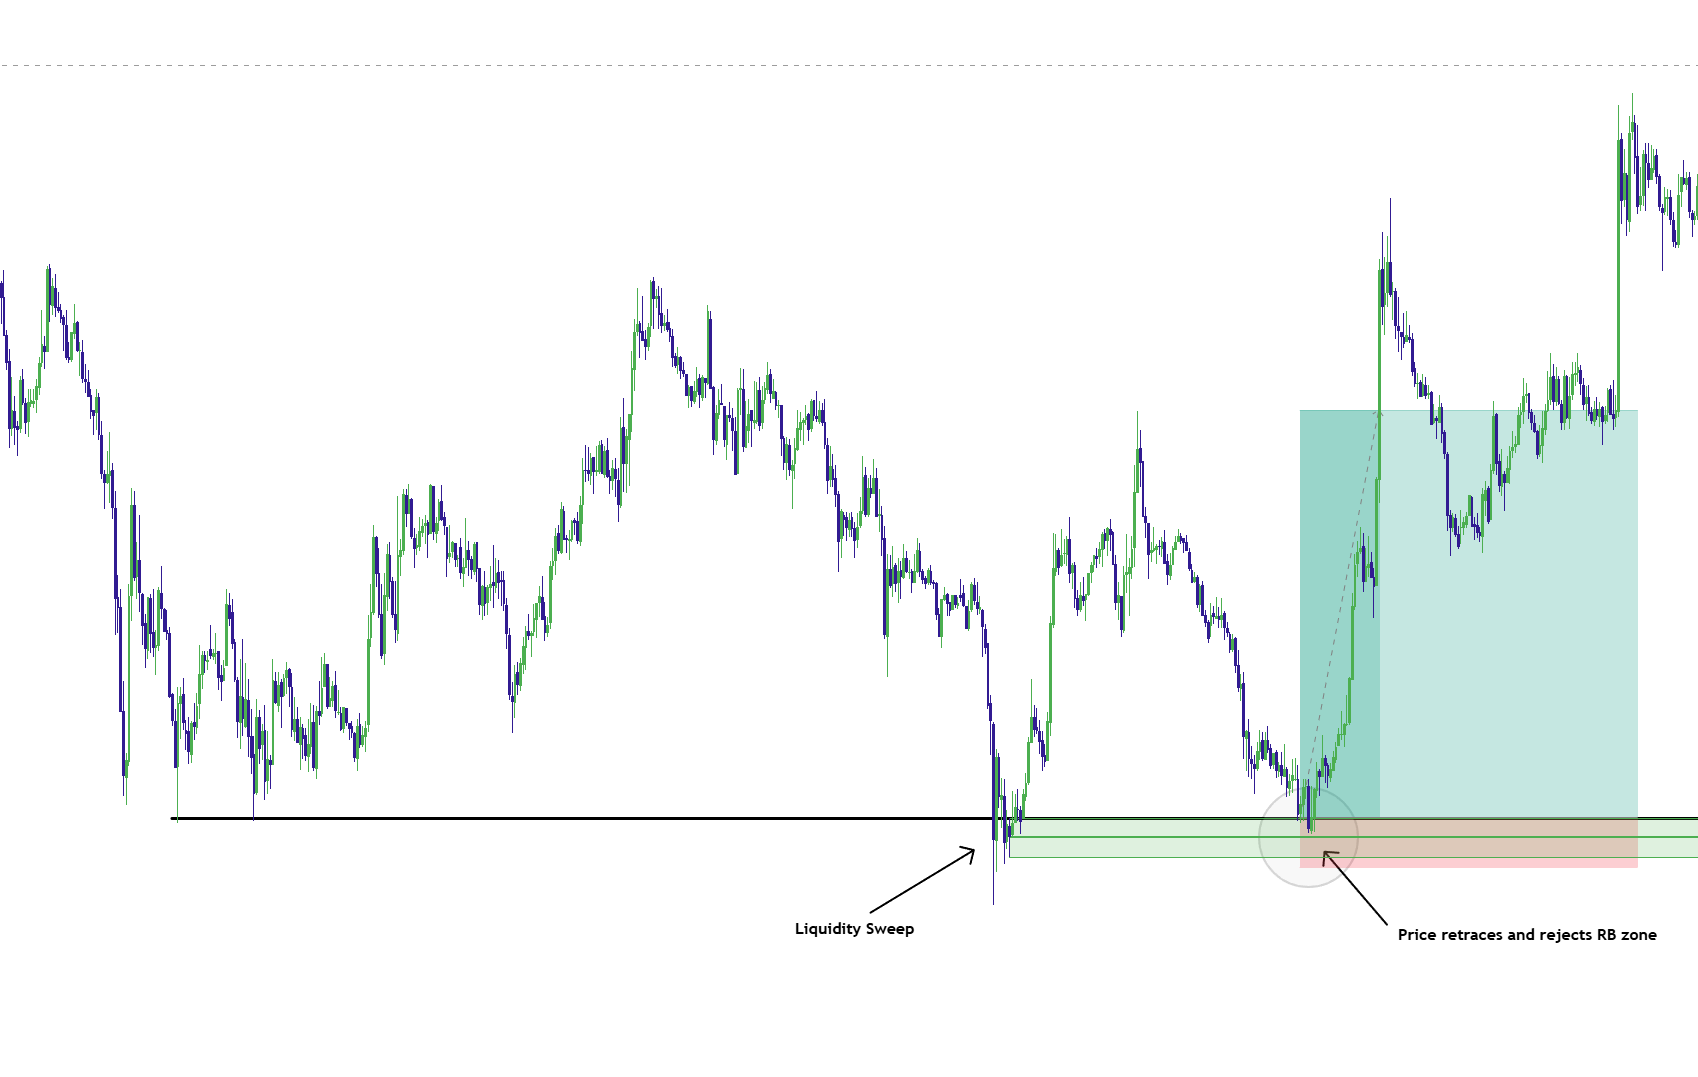
Playbook 1: Liquidity Sweep → Displacement → RB Retest
This is the primary counter-trend reversal setup.
Bullish version
- Step 1: Price trades into meaningful sell-side liquidity such as PDL, London Low, or a major prior swing low.
- Step 2: Price sweeps below the level and begins to reject.
- Step 3: Strong bullish displacement confirms that buyers responded.
- Step 4: A bullish Reversal Block is validated around the low.
- Step 5: Wait for price to retrace into the RB.
- Step 6: Prioritize the CE area.
- Step 7: Look for rejection, bullish divergence, seller exhaustion, or another Elev8+ trigger.
- Step 8: Invalidation is normally below the opposite side of the RB / sweep extreme.
Bearish version
- Step 1: Price trades into meaningful buy-side liquidity such as PDH, London High, or a major prior swing high.
- Step 2: Price sweeps above the level and fails to hold.
- Step 3: Strong bearish displacement confirms the rejection.
- Step 4: A bearish Reversal Block is validated around the high.
- Step 5: Wait for a retracement into the RB.
- Step 6: Watch CE.
- Step 7: Use rejection, bearish divergence, buyer exhaustion, or another trigger for execution.
- Step 8: Invalidation is normally above the opposite side of the RB / sweep extreme.
Example 5: Liquidity sweep + Reversal Block CE retest

Playbook 2: Trend Pullback Into a Reversal Block
Despite the name, Reversal Blocks are not only for major counter-trend reversals. They can also be excellent locations for entering a pullback in the direction of the larger trend.
In a strong bullish trend:
- Price displaces higher.
- A bullish RB is left behind beneath price.
- Price pulls back rather than continuing straight up.
- The RB becomes a possible support area.
- Price reaches CE and begins to reject.
- Trend continuation resumes toward liquidity above.
The bearish version is the opposite.
Continuation rule
When trading with the higher-timeframe trend, you do not necessarily need a major opposing liquidity sweep first. Strong trend + displacement + corrective pullback + RB defense can be enough to create a quality continuation setup.
Example 6: Trend pullback into bullish RB CE

Playbook 3: Extended Move → RB + Exhaustion Reversal
Another powerful use for Reversal Blocks is at the end of an extended directional push.
This works especially well when Elev8+ Market Extremes or another momentum tool shows that price is already stretched.
A clean bearish example might look like:
- Price has pushed aggressively higher.
- Market Extremes shows buyer exhaustion.
- Price reaches a major prior high or HTF resistance area.
- A bearish RB develops around the extreme.
- Price retraces back toward RB CE.
- Bearish divergence or rejection appears.
- The market begins rotating back toward the mean.
The important distinction is that extension alone is not the trade. Extension tells you chasing may be dangerous. The RB gives you structure, and the rejection gives you timing.
Example 7: Reversal Block + Market Extremes exhaustion

Rejection, Divergence, and Exhaustion: What Should Confirm CE?
Touching CE is not enough by itself. A clean entry should normally have some evidence that the RB is being defended.
1) Price rejection
- wick through CE followed by a close back away,
- failed continuation through the block,
- multiple attempts to push deeper that cannot hold,
- strong opposite-direction candle after the test.
2) Divergence
Divergence can show that price is reaching a new extreme while momentum or order flow is failing to confirm it.
- Bullish divergence: price makes a lower low while momentum makes a higher low.
- Bearish divergence: price makes a higher high while momentum makes a lower high.
Divergence is especially useful when the RB is already sitting at external liquidity.
3) Exhaustion
Elev8+ Market Extremes can help identify when the move into the RB is already statistically stretched. RB + CE + exhaustion is much stronger context than taking an RB in the middle of a normal range.
4) Elev8+ confirmation signals
If an Elev8+ reversal trigger appears while price is testing the RB or CE, it can provide another layer of timing confirmation.
Think in layers
Liquidity tells you why.
RB tells you where.
CE improves the location.
Divergence / exhaustion / rejection tells you when.
Stop Loss Placement
One of the biggest advantages of Reversal Blocks is that the zone gives you a logical invalidation point.
The standard approach is:
- Bullish RB: stop below the opposite/lower side of the zone or below the sweep extreme when appropriate.
- Bearish RB: stop above the opposite/upper side of the zone or above the sweep extreme when appropriate.
If the zone is so wide that the stop no longer makes sense for your risk plan, the solution is usually to skip the trade rather than force a tighter stop into the middle of the RB.
How Reversal Blocks Become Invalid
By default, Elev8+ Reversal Blocks uses Close Through invalidation.
That means a wick through the edge does not automatically remove the zone. Price must close beyond the opposite boundary for the RB to be considered invalid.
- Bullish RB: close below the lower edge = invalid.
- Bearish RB: close above the upper edge = invalid.
This is useful because liquidity sweeps can temporarily wick through a zone before price rejects.
Example 8: Wick through vs true RB invalidation

Advanced Zone Quality Filters
Reversal Blocks includes several optional filters for traders who want fewer zones and more confirmation. These are intentionally optional because requiring every condition can remove good setups.
Liquidity Sweep Filter
Requires the original zone to have swept a confirmed local liquidity pivot before it can activate. This can be useful when your strategy is specifically focused on reversal setups.
Previous Day Extreme Filter
Requires the RB to form near PDH or PDL. This is a very selective filter and is best used when you specifically want previous-day liquidity setups.
MSS / BOS Confirmation
The optional structure filter can require price to break a previously confirmed swing level before the RB becomes valid.
This adds another layer of evidence that the move away from the zone actually changed short-term structure.
Volume Filter
The optional hard volume filter requires elevated volume relative to its baseline. This can reduce quieter candidates, but it should not automatically be assumed that higher volume always creates the better trade.
Zone Score
Reversal Blocks also contains an optional score system. When enabled, zones can receive additional points for:
- displacement,
- MSS / BOS confirmation,
- liquidity sweep,
- PDH / PDL proximity,
- strong candle range,
- and remaining untouched before activation.
The score filter is OFF by default. It is best viewed as another way to rank zones—not as proof that a particular RB will hold.
First Retest vs Repeated Retests
A useful concept with any reaction zone is freshness.
In many cases, the first clean return to a validated RB is the easiest setup to interpret because the area has not already been repeatedly tested.
Reversal Blocks can either remain visible until invalidation or be configured to disappear after the first touch. A retest limit can also be enabled if you prefer to focus only on fresher zones.
Simple rule
A zone that has been tested several times should generally require stronger confirmation than a fresh first retest. Do not assume that because an RB survived once it must survive forever.
Alerts: Let Price Come to the Zone
Reversal Blocks includes alerts specifically designed around the retest workflow.
Available alert events include:
- Bullish RB Zone Entry
- Bearish RB Zone Entry
- Bullish RB CE Touch
- Bearish RB CE Touch
- Any Bullish or Bearish RB Zone Entry
- Any Bullish or Bearish RB CE Touch
- Any RB Zone Entry or CE Touch
This is one of the best ways to use the indicator: identify the important zones first, then let TradingView notify you when price returns instead of staring at every candle.
The A+ Reversal Block Model
You do not need every condition below on every trade. But the more of these that naturally align, the stronger the setup becomes.
A+ Reversal Block Checklist
• Price is at meaningful external liquidity or HTF structure.
• Liquidity was swept before the reversal when trading counter-trend.
• Strong displacement occurred away from the RB.
• The RB overlaps or aligns across multiple timeframes.
• Price retraces instead of being chased after displacement.
• The retracement reaches the RB or preferably CE.
• Price shows rejection / failed continuation inside the zone.
• Divergence or exhaustion supports the reaction.
• Stop loss can logically sit beyond the opposite side of the RB.
• There is enough room to the next liquidity target for the trade to make sense.
If the only reason for entering is “price touched a colored box,” you do not have an A+ Reversal Block setup.
Example 9: Full A+ Reversal Block confluence
Simple Decision Tree
Reversal Block Decision Tree
Step 1: Is this RB at meaningful structure, trend support/resistance, or external liquidity?
Step 2: Did the zone produce strong displacement?
Step 3: Does the RB align with another timeframe or Elev8+ context tool?
Step 4: Is price retracing into the zone rather than being chased?
Step 5: Is price testing CE or another logical part of the RB?
Step 6: Do you see rejection, divergence, exhaustion, or another confirmation?
If YES: define invalidation beyond the RB and evaluate the next liquidity target.
If NO: wait. The zone is context—not an obligation to trade.
Suggested Settings: Start With the Defaults
Reversal Blocks is designed so the default settings already remove many weak candidates. New users should generally learn the base behavior before turning on every advanced filter.
- Show Bullish Structure RBs: ON
- Show Bearish Structure RBs: ON
- Zone Source: Full Candle
- Minimum Candle Size: ON
- Minimum Range: 0.60 ATR
- Require Displacement: ON
- Displacement: 2.0 ATR / minimum 40 ticks
- Show CE: ON
- Retest Handling: Keep Until Invalidated
- Invalidation: Close Through
- Hide Overlapping Same-Direction Zones: ON
- Advanced liquidity / BOS / volume filters: OFF initially
- Score Filter: OFF initially
Timeframe activation profiles
The indicator automatically adjusts how long a potential RB must mature before activation depending on chart timeframe:
- 1m–2m: 15 bars
- 3m–5m: 10 bars
- 15m: 8 bars
- 1H: 5 bars
- 4H: 3 bars
- Daily+: 2 bars
This helps keep the concept consistent across different chart speeds instead of using the exact same waiting period everywhere.
Best Timeframes
Reversal Blocks can be useful across several timeframes because each timeframe answers a different question.
- 15s–1m: precision execution and scalping around already identified structure.
- 2m–5m: strong balance between entry precision and meaningful intraday structure.
- 15m: larger intraday zones that can produce stronger reactions and swing setups.
- 1H–4H: major structural reaction areas that can matter for much larger moves.
One of the cleanest workflows is to use a higher timeframe to determine the important area, then use a lower timeframe to refine the CE entry and confirmation.
Common Mistakes (and the Fix)
- Mistake: Buying every green RB and selling every red RB. Fix: RBs are locations. Wait for price to prove the reaction.
- Mistake: Ignoring where the zone formed. Fix: prioritize RBs at liquidity, HTF structure, or strong trend pullback locations.
- Mistake: Entering at the outside edge automatically. Fix: use CE as your primary reference and watch how price behaves as it trades deeper into the zone.
- Mistake: Chasing price after displacement. Fix: let the RB do its job—wait for price to retrace back to you.
- Mistake: Treating every timeframe equally. Fix: give extra attention to areas where higher-timeframe and lower-timeframe RBs overlap.
- Mistake: Fading a strong trend just because a bearish/bullish RB exists. Fix: counter-trend reversals should have a stronger reason such as liquidity sweep, exhaustion, divergence, or major HTF structure.
- Mistake: Continuing to trust a zone after price clearly accepts beyond it. Fix: respect invalidation. A close through the opposite side means the original reaction thesis failed.
- Mistake: Moving the stop into the middle of the RB just to reduce risk. Fix: if the logical invalidation is too expensive, skip the setup or reduce position size.
Putting It All Together
Elev8+ Reversal Blocks is designed around a simple idea: stop chasing price and start preparing for the areas where price has already shown that it can react.
For trend continuation, look for a strong move, a validated RB, and a controlled pullback into CE.
For larger reversals, demand more: meaningful liquidity, a sweep, strong displacement away, an RB at the extreme, and confirmation when price returns.
The complete Elev8 RB framework
Liquidity / trend = reason.
Displacement = proof.
Reversal Block = location.
CE = precision.
Rejection / divergence / exhaustion = trigger.
Opposite side of the RB = invalidation.
Want to stop chasing moves and start trading the retracement?
Elev8+ Reversal Blocks maps validated reaction areas before price returns to them. Combine RBs with Market Map liquidity levels, Market Extremes exhaustion, Momentum Gaps, divergence, and Elev8+ confirmation signals to focus on better locations with clearly defined invalidation.
Indicators and examples are for education only. Always define risk and trade only what fits your plan.
Quick Checklist
- I can explain how a validated Reversal Block and its CE midpoint form.
- I can evaluate displacement, liquidity, and first-retest quality at a block.
- I can define confirmation and invalidation before trading an RB reaction.
What Invalidates the Setup?
Stand aside when meaningful location, the expected price response, confirmation, clearly defined structural risk, or a realistic target is missing. A tool or signal by itself does not complete the trade thesis.
Common Mistakes
- Using every available tool on every setup.
- Treating a plotted level, zone, alert, or label as an entry by itself.
Next Recommended Lesson
Elev8+ VWAP Deviation: 2–3 SD Extreme Zones, Mean Reversion, and High-Quality Reversal Setups →