What You'll Learn
- Interpret VWAP and the 2-3 standard-deviation extension zones.
- Separate rejection-based mean reversion from acceptance and trend strength.
- Plan confirmation, invalidation, and realistic value targets.
New Release • VWAP + Standard Deviation + Mean Reversion
Elev8+ VWAP Deviation: See When Price Is Stretched Away From the Mean
Price does not move away from fair value forever. Elev8+ VWAP Deviation maps statistically stretched areas around VWAP so you can quickly see when price is trading unusually far from the session's volume-weighted mean.
The primary focus is the area between 2 and 3 standard deviations from VWAP. When price pushes into this zone—and especially when it penetrates the 3 SD extreme—the market may be reaching an area where chasing continuation becomes increasingly risky and a rotation back toward the mean becomes more attractive.
The key is confirmation. VWAP Deviation works best when the extreme also lines up with Reversal Blocks, Market Extremes exhaustion, divergence, liquidity sweeps, or visible rejection. In a powerful trend, price can remain extended much longer than expected, so the deviation zone should never be treated as an automatic fade.
Educational content only. Not financial advice. No performance guarantees.
Core idea
VWAP represents the market's volume-weighted mean. The farther price stretches into the 2–3 SD zone, the more extended the move has become relative to that mean.
Extreme area
A push through 3 SD is a major extension. Instead of automatically fading it, watch for failure, exhaustion, divergence, or rejection before looking for mean reversion.
Best combo
The strongest setups occur when a Reversal Block, liquidity level, or Market Extremes signal sits inside the VWAP deviation zone and price begins to lose momentum.
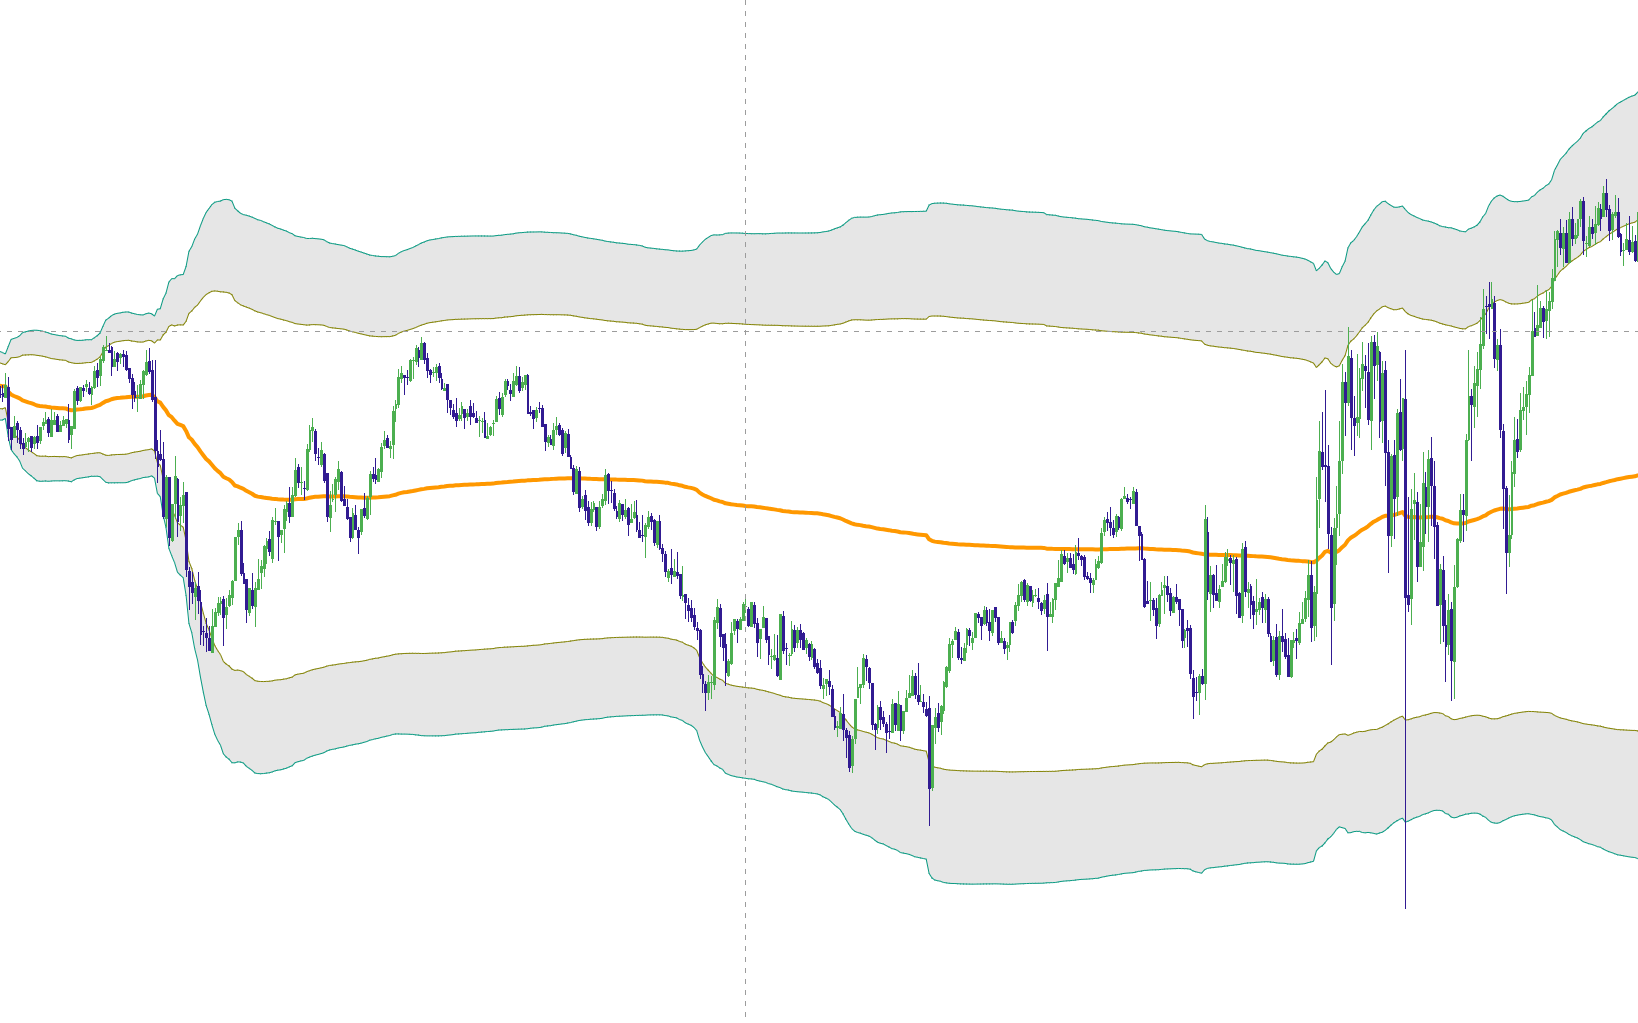
Example 1: VWAP with upper and lower 2–3 SD extreme zones
What Is VWAP?
VWAP stands for Volume Weighted Average Price. Instead of treating every traded price equally, VWAP weights price by the amount of volume traded there.
For intraday traders, VWAP can be thought of as a moving reference for the session's average traded price or mean.
Price can trade above or below VWAP for long periods, but the farther it moves away from VWAP, the more useful it becomes to ask:
The question
“Is price still moving efficiently in a real trend—or has it stretched far enough from the mean that continuation is becoming difficult?”
What Do the Standard Deviation Bands Mean?
Elev8+ VWAP Deviation measures how far price has spread away from VWAP and projects standard deviation bands above and below it.
The default chart focuses on:
- VWAP: the session mean.
- 2 SD: the beginning of the primary extension area.
- 3 SD: the outer extreme.
By default, the indicator shades the area between 2 SD and 3 SD. This creates a simple visual zone showing where price has become significantly displaced from VWAP.
Inside 2 SD
Price trading inside the 2 SD boundary is generally not the type of extension this indicator is designed to fade. The market may simply be rotating normally around VWAP or trending within a reasonable range.
Between 2 SD and 3 SD
This is the primary extension zone.
When price reaches this area, continuation may still occur, but the move is becoming increasingly stretched. This is where you should stop chasing and start watching for signs that buyers or sellers are losing control.
Beyond 3 SD
A penetration of the 3 SD band represents a significant extension from VWAP.
These are often some of the best places to look for a reaction—but only when the surrounding price action confirms that the push is actually failing.
Important
3 SD does not mean “automatic reversal.” It means price is extremely stretched. The trade comes when the market shows that it can no longer maintain that extension.
Example 2: Price penetrates 3 SD and rejects

The Main Strategy: Extension → Failure → Mean Reversion
The core VWAP Deviation setup is simple:
- Step 1: Price moves aggressively away from VWAP.
- Step 2: Price enters the 2–3 SD extension zone.
- Step 3: Ideally, price reaches or penetrates 3 SD.
- Step 4: Continuation begins to stall or fail.
- Step 5: Look for rejection, divergence, exhaustion, a Reversal Block, or another confirmation.
- Step 6: Enter only after the market proves that the extreme is being rejected.
- Step 7: Target a rotation back toward the mean or another logical structure level.
The Elev8 rule
VWAP Deviation = extension. Confluence = reason. Rejection = trigger. VWAP = potential mean-reversion destination.
Upper Deviation Setup: Buyer Exhaustion
When price pushes into the upper 2–3 SD zone, the market is extended above VWAP.
That does not mean you immediately short. First determine whether buyers are continuing to accept higher prices or whether the move is beginning to fail.
A higher-quality bearish setup looks like:
- Price reaches the upper 2–3 SD zone.
- Preferably, price tests or penetrates upper 3 SD.
- The move is also reaching PDH, a session high, prior swing high, or another meaningful resistance area.
- Market Extremes shows buyer exhaustion or bearish divergence.
- A bearish Reversal Block is located inside the deviation zone.
- Price rejects rather than continuing to hold above 3 SD.
- The trade looks for rotation back toward VWAP or the next important structure level below.
Lower Deviation Setup: Seller Exhaustion
The lower setup is the exact opposite.
- Price reaches the lower 2–3 SD extension zone.
- Preferably, price penetrates lower 3 SD.
- Price is also near PDL, a session low, prior swing low, or another major support/liquidity area.
- Market Extremes shows seller exhaustion or bullish divergence.
- A bullish Reversal Block sits inside the deviation zone.
- Price rejects the lower extreme.
- The market begins rotating back toward VWAP or the next important level above.
Example 3: Lower 3 SD extension → rejection → rotation toward VWAP

Why Reversal Blocks Work So Well With VWAP Deviation
VWAP Deviation tells you that price is stretched. Reversal Blocks tell you that price is also reaching a previously validated reaction area.
When the two overlap, the setup has a much stronger explanation.
The combination
VWAP Deviation: price is far from the mean.
Reversal Block: price is entering a location that previously produced a meaningful reaction.
CE: gives you a precise area inside that RB.
Rejection / divergence / exhaustion: confirms that the extreme may be failing.
This is significantly better context than fading 3 SD simply because price touched a line.
Playbook 1: 3 SD + Reversal Block CE
This is one of the strongest VWAP Deviation combinations.
Bullish version
- Step 1: Price becomes extended below VWAP.
- Step 2: Price enters the lower 2–3 SD zone.
- Step 3: A bullish Reversal Block is located inside or very close to the deviation zone.
- Step 4: Price pushes toward or through lower 3 SD.
- Step 5: Price trades into the RB, preferably near CE.
- Step 6: Wait for rejection, seller exhaustion, bullish divergence, or another Elev8+ trigger.
- Step 7: Stop normally belongs beyond the opposite side of the RB / extreme.
- Step 8: First targets can be internal structure, 2 SD, or VWAP depending on the strength of the rotation.
Bearish version
- Step 1: Price becomes extended above VWAP.
- Step 2: Price enters the upper 2–3 SD zone.
- Step 3: A bearish Reversal Block overlaps the extreme.
- Step 4: Price reaches or penetrates upper 3 SD.
- Step 5: The RB / CE is tested.
- Step 6: Look for rejection, buyer exhaustion, or bearish divergence.
- Step 7: Invalidation belongs beyond the RB / extreme.
- Step 8: Look for rotation toward 2 SD, nearby structure, and potentially VWAP.
Example 4: Reversal Block CE inside the VWAP deviation zone

Playbook 2: VWAP Extreme + Market Extremes Divergence
VWAP Deviation and Market Extremes answer two different questions:
- VWAP Deviation: How far has price moved from the mean?
- Market Extremes: Is momentum showing signs of exhaustion or divergence?
When both agree, you have much better context for a reversal.
Bearish example
- Price pushes into or through upper 3 SD.
- Market Extremes enters buyer exhaustion.
- Price makes another high, but momentum fails to confirm it.
- Bearish divergence forms.
- Price begins rejecting the extreme.
- Look for rotation toward VWAP / nearby support.
Bullish example
- Price pushes through lower 3 SD.
- Market Extremes shows seller exhaustion.
- Price makes a lower low while momentum improves.
- Bullish divergence appears.
- Price reclaims the extreme.
- Look for rotation back toward the mean.
Example 5: 3 SD extension + Market Extremes divergence

Playbook 3: Liquidity Sweep Inside the Deviation Zone
External liquidity adds another powerful layer.
Examples include:
- PDH / PDL
- Asia High / Low
- London High / Low
- Previous Week High / Low
- Major 1H / 4H swing highs and lows
- Equal highs / equal lows
If price reaches 3 SD at the exact same time it is sweeping one of these levels, the market may be both statistically extended and taking external liquidity.
Example bearish sequence
- Price rallies well above VWAP.
- Upper 2–3 SD zone is reached.
- PDH or London High sits inside the extension zone.
- Price runs above the liquidity level and pushes through 3 SD.
- The breakout fails to hold.
- Bearish rejection / divergence appears.
- Price rotates back below the swept level and toward VWAP.
Example 6: Session liquidity sweep at a VWAP extreme

When VWAP Mean Reversion Works Best
VWAP Deviation generally performs best when the market is behaving in a way that allows price to rotate around a central mean.
Favorable conditions include:
- balanced or ranging sessions,
- two-sided price action,
- failed breakouts,
- liquidity sweeps,
- decreasing momentum at new extremes,
- visible exhaustion,
- divergence,
- and Reversal Blocks or other structure inside the deviation zone.
The Biggest Danger: Strong Trend Days
The largest mistake with VWAP deviation bands is assuming that price must return to VWAP simply because it has reached 2 SD or 3 SD.
During a strong directional session, price can:
- reach 2 SD,
- continue through 3 SD,
- stay extended,
- pull back only slightly,
- and then continue trending without returning to VWAP.
In other words: an extreme can represent exhaustion—or exceptional strength.
Do not fight acceptance
If price reaches 3 SD and continues producing strong displacement candles, shallow pullbacks, higher highs / lower lows, and repeated closes that hold the extreme, do not keep fading the move simply because the market is statistically stretched.
Signs you should NOT fade 3 SD yet
- Strong consecutive closes in the trend direction.
- No rejection wicks or failed continuation.
- No divergence; momentum confirms each new extreme.
- Pullbacks are shallow and immediately bought/sold.
- Price holds outside 3 SD instead of quickly returning inside.
- Higher-timeframe trend is strongly aligned with the move.
Example 7: When NOT to fade the deviation zone

Rejection vs Acceptance at 3 SD
One of the easiest ways to improve VWAP Deviation trades is to stop thinking only about where price is and start watching how price behaves there.
Rejection
Rejection is what you want to see for a mean-reversion setup.
- Wick through 3 SD followed by a close back inside.
- Break through the extreme that immediately fails.
- Repeated inability to continue farther from VWAP.
- Strong opposite-direction candle.
- Divergence forming at the new price extreme.
Acceptance
Acceptance tells you not to fight the trend yet.
- Multiple candles close beyond 3 SD.
- Pullbacks hold the 3 SD region as support/resistance.
- Momentum remains strong.
- Price continues expanding away from VWAP.
The key distinction
Touching 3 SD = extension.
Rejecting 3 SD = possible reversal.
Holding beyond 3 SD = trend strength / acceptance.
Targets: Does Price Always Return to VWAP?
No.
VWAP is the logical mean-reversion destination, but the market does not owe you a complete return to VWAP on every setup.
Depending on market structure, logical targets can include:
- 3 SD back inside the zone after an extreme penetration,
- 2 SD,
- nearby session structure,
- an opposing Reversal Block,
- previous session high/low,
- VWAP itself if the market develops a full rotation.
A powerful reaction from an extreme can sometimes travel all the way back to VWAP. A weaker reaction may only rotate from 3 SD toward 2 SD before the trend resumes.
Stop Loss Placement
VWAP deviation lines by themselves do not always provide a precise invalidation point. That is one reason the indicator works especially well with Reversal Blocks and liquidity structure.
Common approaches include:
- Reversal Block setup: stop beyond the opposite edge of the RB.
- Liquidity sweep setup: stop beyond the sweep extreme.
- Pure rejection setup: stop beyond the rejection swing high/low.
The stop should invalidate the reason for the trade—not simply be placed a random number of points away from entry.
Normal Session VWAP vs RTH NY VWAP
Elev8+ VWAP Deviation includes two VWAP frameworks.
Normal VWAP
The standard VWAP is enabled by default and uses a Session anchor by default.
The anchor can also be changed to:
- Week
- Month
- Quarter
- Year
- and other available anchor periods.
RTH NY VWAP
The indicator also includes an optional New York Regular Trading Hours VWAP.
When enabled, it calculates VWAP using only the selected NY RTH session. This gives futures traders another way to evaluate extension relative specifically to the regular New York session.
The RTH version also has its own 2 SD and 3 SD bands.
Advanced confluence
If the normal VWAP deviation extreme and the NY RTH VWAP deviation extreme cluster around the same price, treat that as additional context. Two independently anchored VWAP frameworks identifying a similar extreme can make the area more important.
Alerts: Know When Price Reaches an Extreme
VWAP Deviation includes built-in alerts for both the 2 SD and 3 SD bands.
Available alert conditions include:
- 2 SD Touch
- 3 SD Touch
- Upper 2 SD Touch
- Lower 2 SD Touch
- Upper 3 SD Touch
- Lower 3 SD Touch
Alerts can monitor the normal VWAP bands, the NY RTH VWAP bands, or both.
This fits the strategy perfectly: instead of watching the chart all session, let the indicator notify you when price actually reaches the area where a mean-reversion setup might begin developing.
The A+ VWAP Mean-Reversion Model
A 3 SD touch by itself is not an A+ trade. The highest-quality setups stack several independent reasons for the move to fail.
VWAP Deviation Checklist
• Price is inside the 2–3 SD extension zone.
• Preferably price reaches or penetrates 3 SD.
• The market is ranging, rotational, or showing signs the current trend is weakening.
• Price is not simply accepting beyond 3 SD with strong closes.
• A Reversal Block overlaps the deviation zone.
• Preferably price tests the RB near CE.
• Market Extremes shows exhaustion.
• Divergence supports the reversal.
• A major liquidity level is nearby or has just been swept.
• Price visibly rejects rather than continuing through the extreme.
• Stop loss can be logically defined beyond structure.
• There is room for rotation toward 2 SD, structure, or VWAP.
The farther price moves from VWAP, the more interesting mean reversion becomes—but extension without failure is still only extension.
Example 9: Full A+ VWAP mean-reversion confluence

Simple Decision Tree
VWAP Mean-Reversion Decision Tree
Step 1: Is price at least inside the 2–3 SD deviation zone?
Step 2: Has price reached or penetrated 3 SD?
Step 3: Is there a meaningful reason for the move to stop here—liquidity, RB, HTF level, divergence, or exhaustion?
Step 4: Is price rejecting the extreme rather than accepting beyond it?
Step 5: Is the broader market ranging / rotational, or is the trend clearly weakening?
If YES: define your invalidation and evaluate a mean-reversion target.
If NO: do not fight the trend simply because price is statistically extended.
Suggested Settings: Start Here
The defaults are designed to keep the indicator visually simple and focused on the areas that matter most for mean-reversion trading.
- Show Normal VWAP: ON
- Anchor Period: Session
- Bands Calculation: Standard Deviation
- 1 SD: OFF
- 2 SD: ON
- 3 SD: ON
- Fill 2 SD to 3 SD: ON
- Fill VWAP to 1 SD: OFF
- Fill 1 SD to 2 SD: OFF
- NY RTH VWAP: OFF initially
- 2 SD Touch Alerts: ON
- 3 SD Touch Alerts: ON
Common Mistakes (and the Fix)
- Mistake: Shorting every upper 3 SD touch. Fix: wait for actual buyer exhaustion or rejection.
- Mistake: Buying every lower 3 SD touch. Fix: require seller failure and confirmation first.
- Mistake: Fighting a powerful trend. Fix: if price accepts outside the extreme with strong closes, step aside.
- Mistake: Assuming VWAP must always be reached. Fix: manage the trade through intermediate structure and 2 SD before expecting a full mean rotation.
- Mistake: Ignoring location. Fix: prioritize deviation extremes that overlap PDH/PDL, session highs/lows, Reversal Blocks, or HTF levels.
- Mistake: Treating extension as confirmation. Fix: extension tells you to stop chasing; rejection tells you when a reversal may actually be starting.
- Mistake: Entering without a logical stop. Fix: use a Reversal Block edge, liquidity sweep extreme, or clear rejection swing to define invalidation.
Putting It All Together
Elev8+ VWAP Deviation is designed to answer one simple question:
“How far has price stretched away from the session's mean?”
The 2–3 SD zones tell you when the market is reaching an area where continuation is becoming increasingly extended. A penetration through 3 SD makes that extension even more significant.
But the edge does not come from fading every extreme.
The edge comes from waiting until the extreme lines up with structure, exhaustion, divergence, liquidity, or a Reversal Block and then watching price prove that the move can no longer continue.
The complete Elev8 VWAP framework
VWAP = mean.
2–3 SD = extension zone.
3 SD penetration = extreme extension.
Liquidity / Reversal Block = location.
Exhaustion / divergence = weakening pressure.
Rejection = trigger.
VWAP / internal structure = mean-reversion targets.
Stop chasing extended moves
Elev8+ VWAP Deviation makes it easy to see when price has moved unusually far from the session's volume-weighted mean. Combine the 2–3 SD zones with Reversal Blocks, Market Extremes, Market Map liquidity levels, divergence, and rejection to identify higher-quality mean-reversion opportunities with defined risk.
Indicators and examples are for education only. Always define risk and trade only what fits your plan.
Quick Checklist
- I can interpret VWAP and the 2-3 standard-deviation extension zones.
- I can separate rejection-based mean reversion from acceptance and trend strength.
- I can plan confirmation, invalidation, and realistic value targets.
What Invalidates the Setup?
Stand aside when meaningful location, the expected price response, confirmation, clearly defined structural risk, or a realistic target is missing. A tool or signal by itself does not complete the trade thesis.
Common Mistakes
- Using every available tool on every setup.
- Treating a plotted level, zone, alert, or label as an entry by itself.
Next Recommended Lesson
Elev8+ Real FVG: Structure-Validated Fair Value Gaps for High-Probability Trend Continuation →