
What You'll Learn
- Identify displacement, impulse zones, FVGs, and overlap areas.
- Distinguish meaningful imbalance from ordinary chart noise.
- Use gaps for confirmation, retests, targets, and structural invalidation.
Momentum + Imbalance + Structural Zones
Elev8+ Momentum Gaps + Order Blocks: Read Displacement, FVGs, Failed Gaps, and Structural Retests
Most traders don’t struggle to find signals—they struggle with location. Elev8+ Momentum Gaps helps you map where price moved with real momentum and left imbalances behind (FVGs + impulse zones), while the dedicated Order Block Tool marks key structural supply/demand zones. Use it as your precision-location layer, then use Elev8+ Reversal triangles as your confirmation trigger after price proves the zone is being respected.
Educational content only. Not financial advice. No performance guarantees.
Core idea
Strong moves leave structure behind. Momentum Gaps highlights displacement, imbalance zones, and order blocks so you can focus on retests created by meaningful expansion instead of random chart levels.
What you get
Impulse Zones (volume + ATR displacement), a FVG Pro engine with quality filters + optional IFVG state tracking, and an Order Block Tool (ICT + swing-extreme engines).
Best combo
Use Momentum Gaps as precision location, then read rejection or acceptance and use Elev8+ Reversal triangles or LS signals as the confirmation when price retests a clean zone.
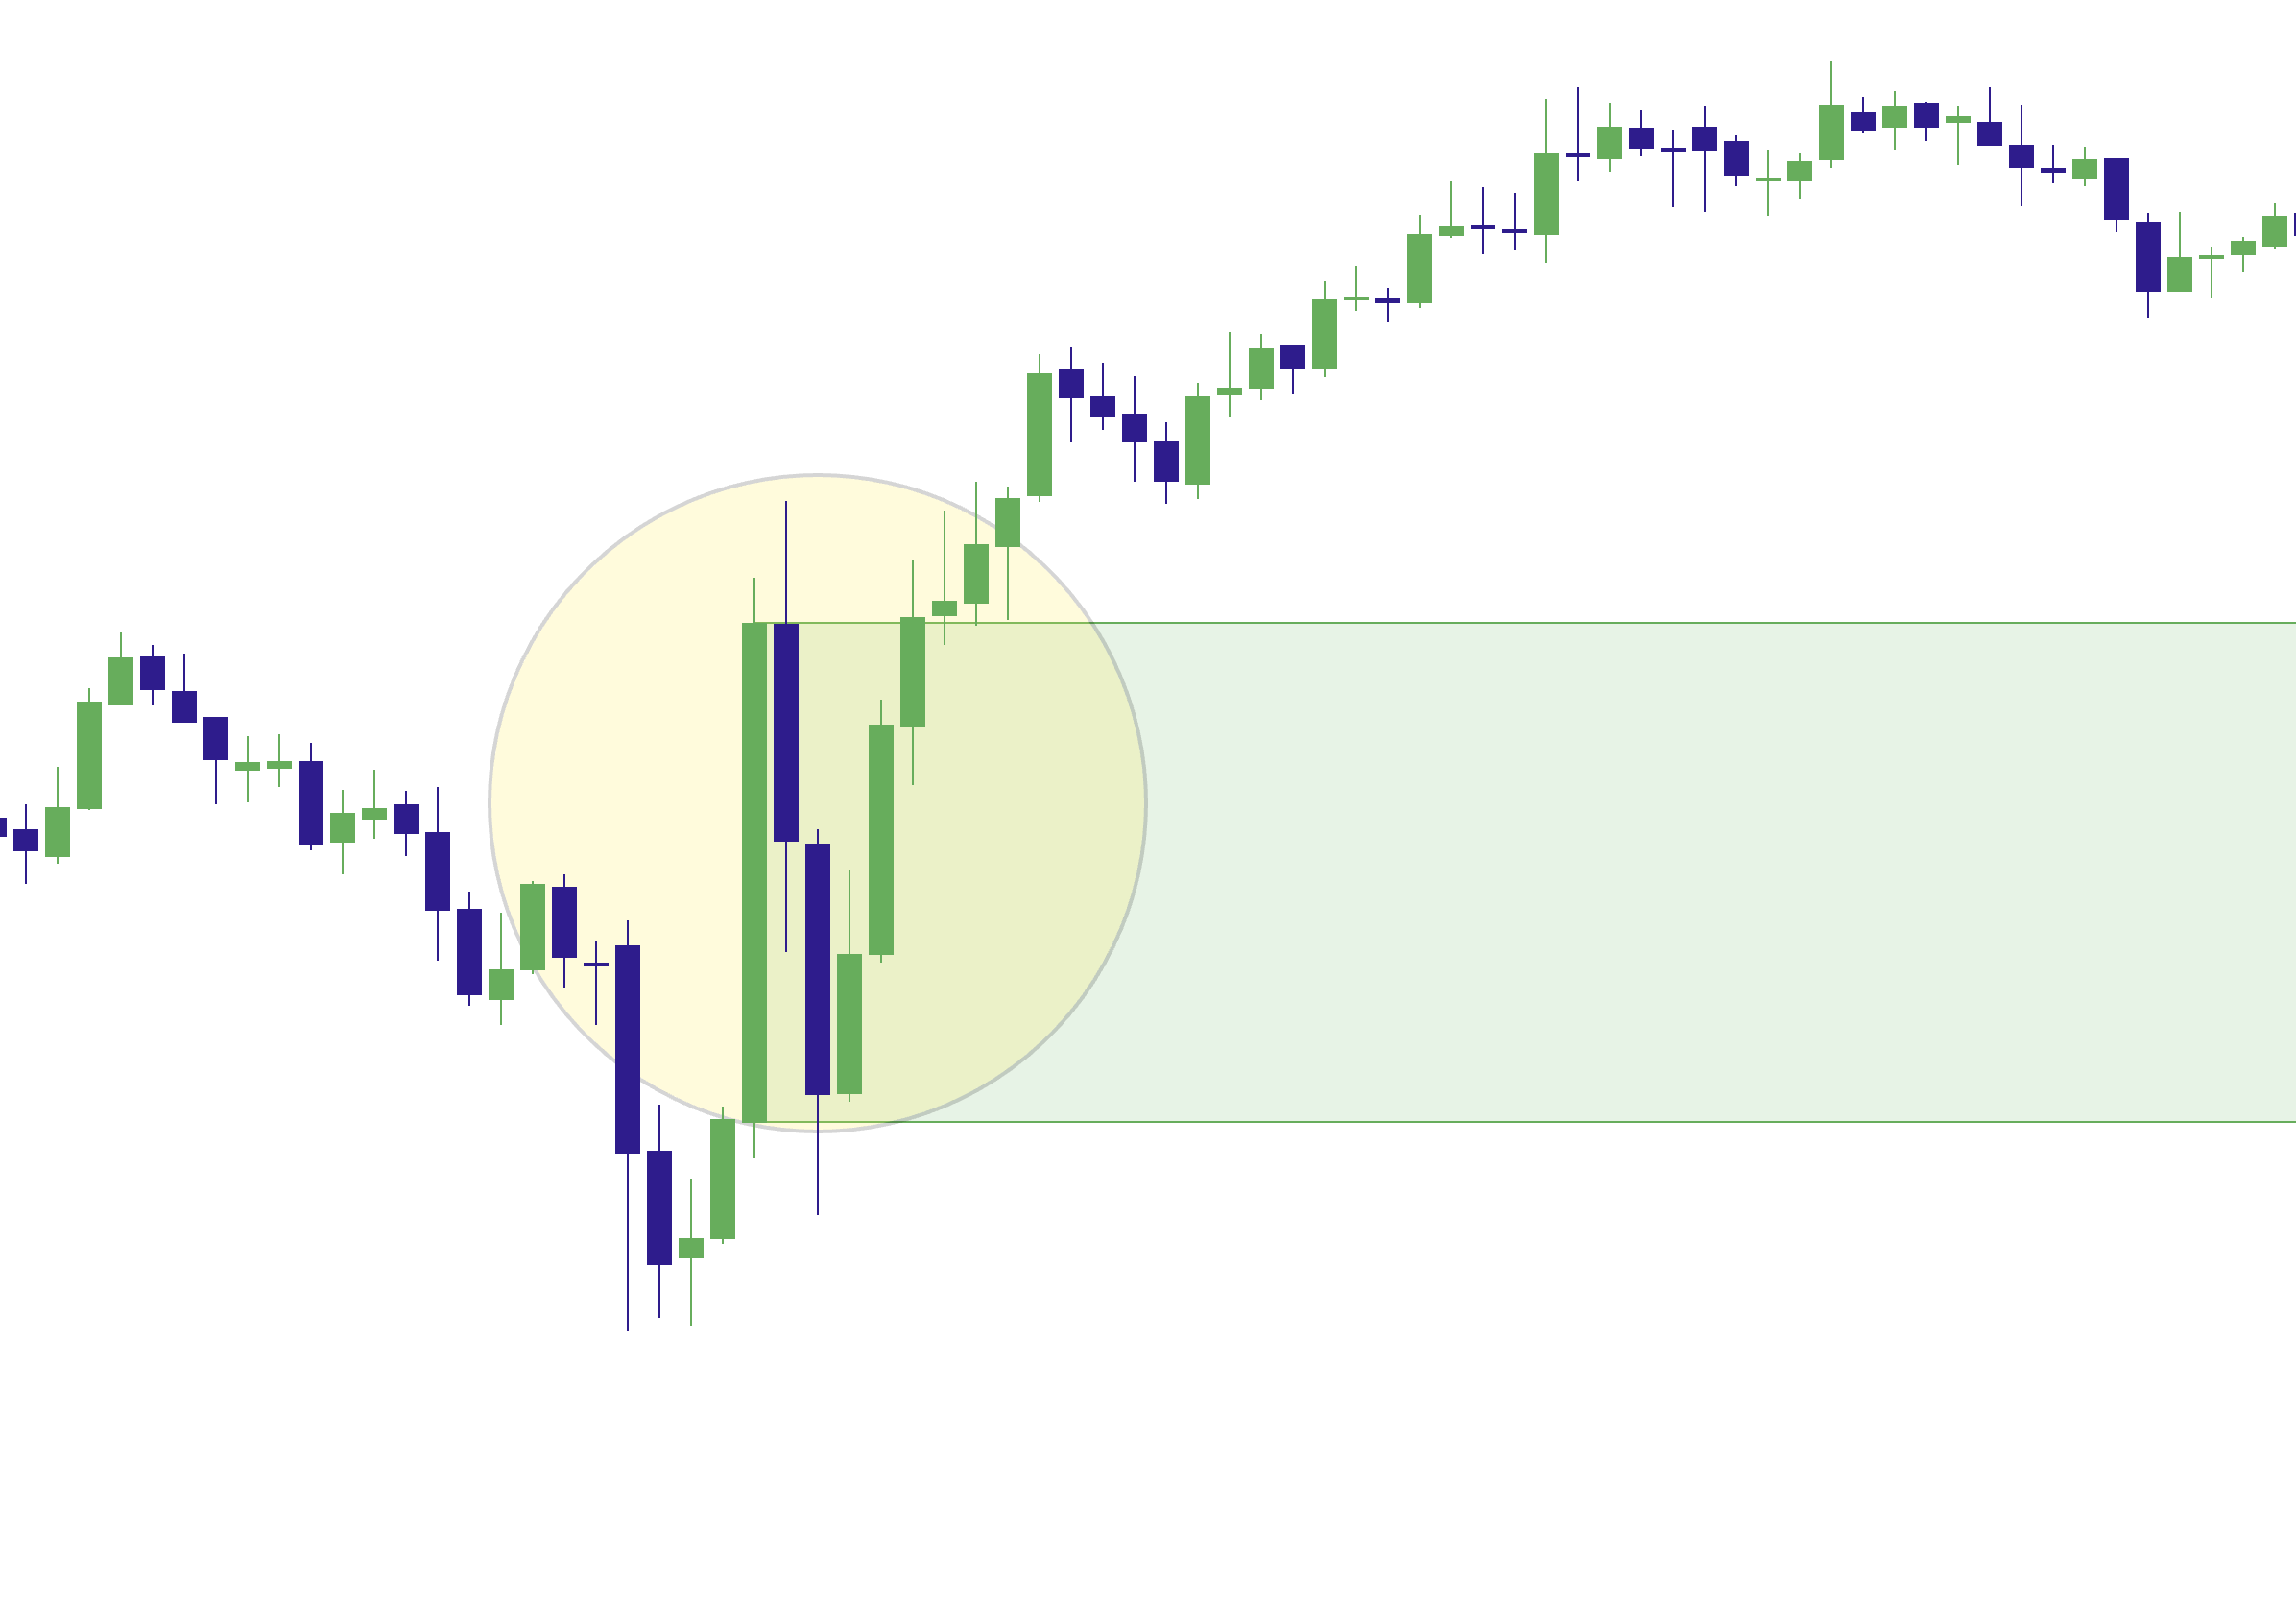
Example 1: Impulse zone prints after strong displacement
What Momentum Gaps Is Actually Measuring
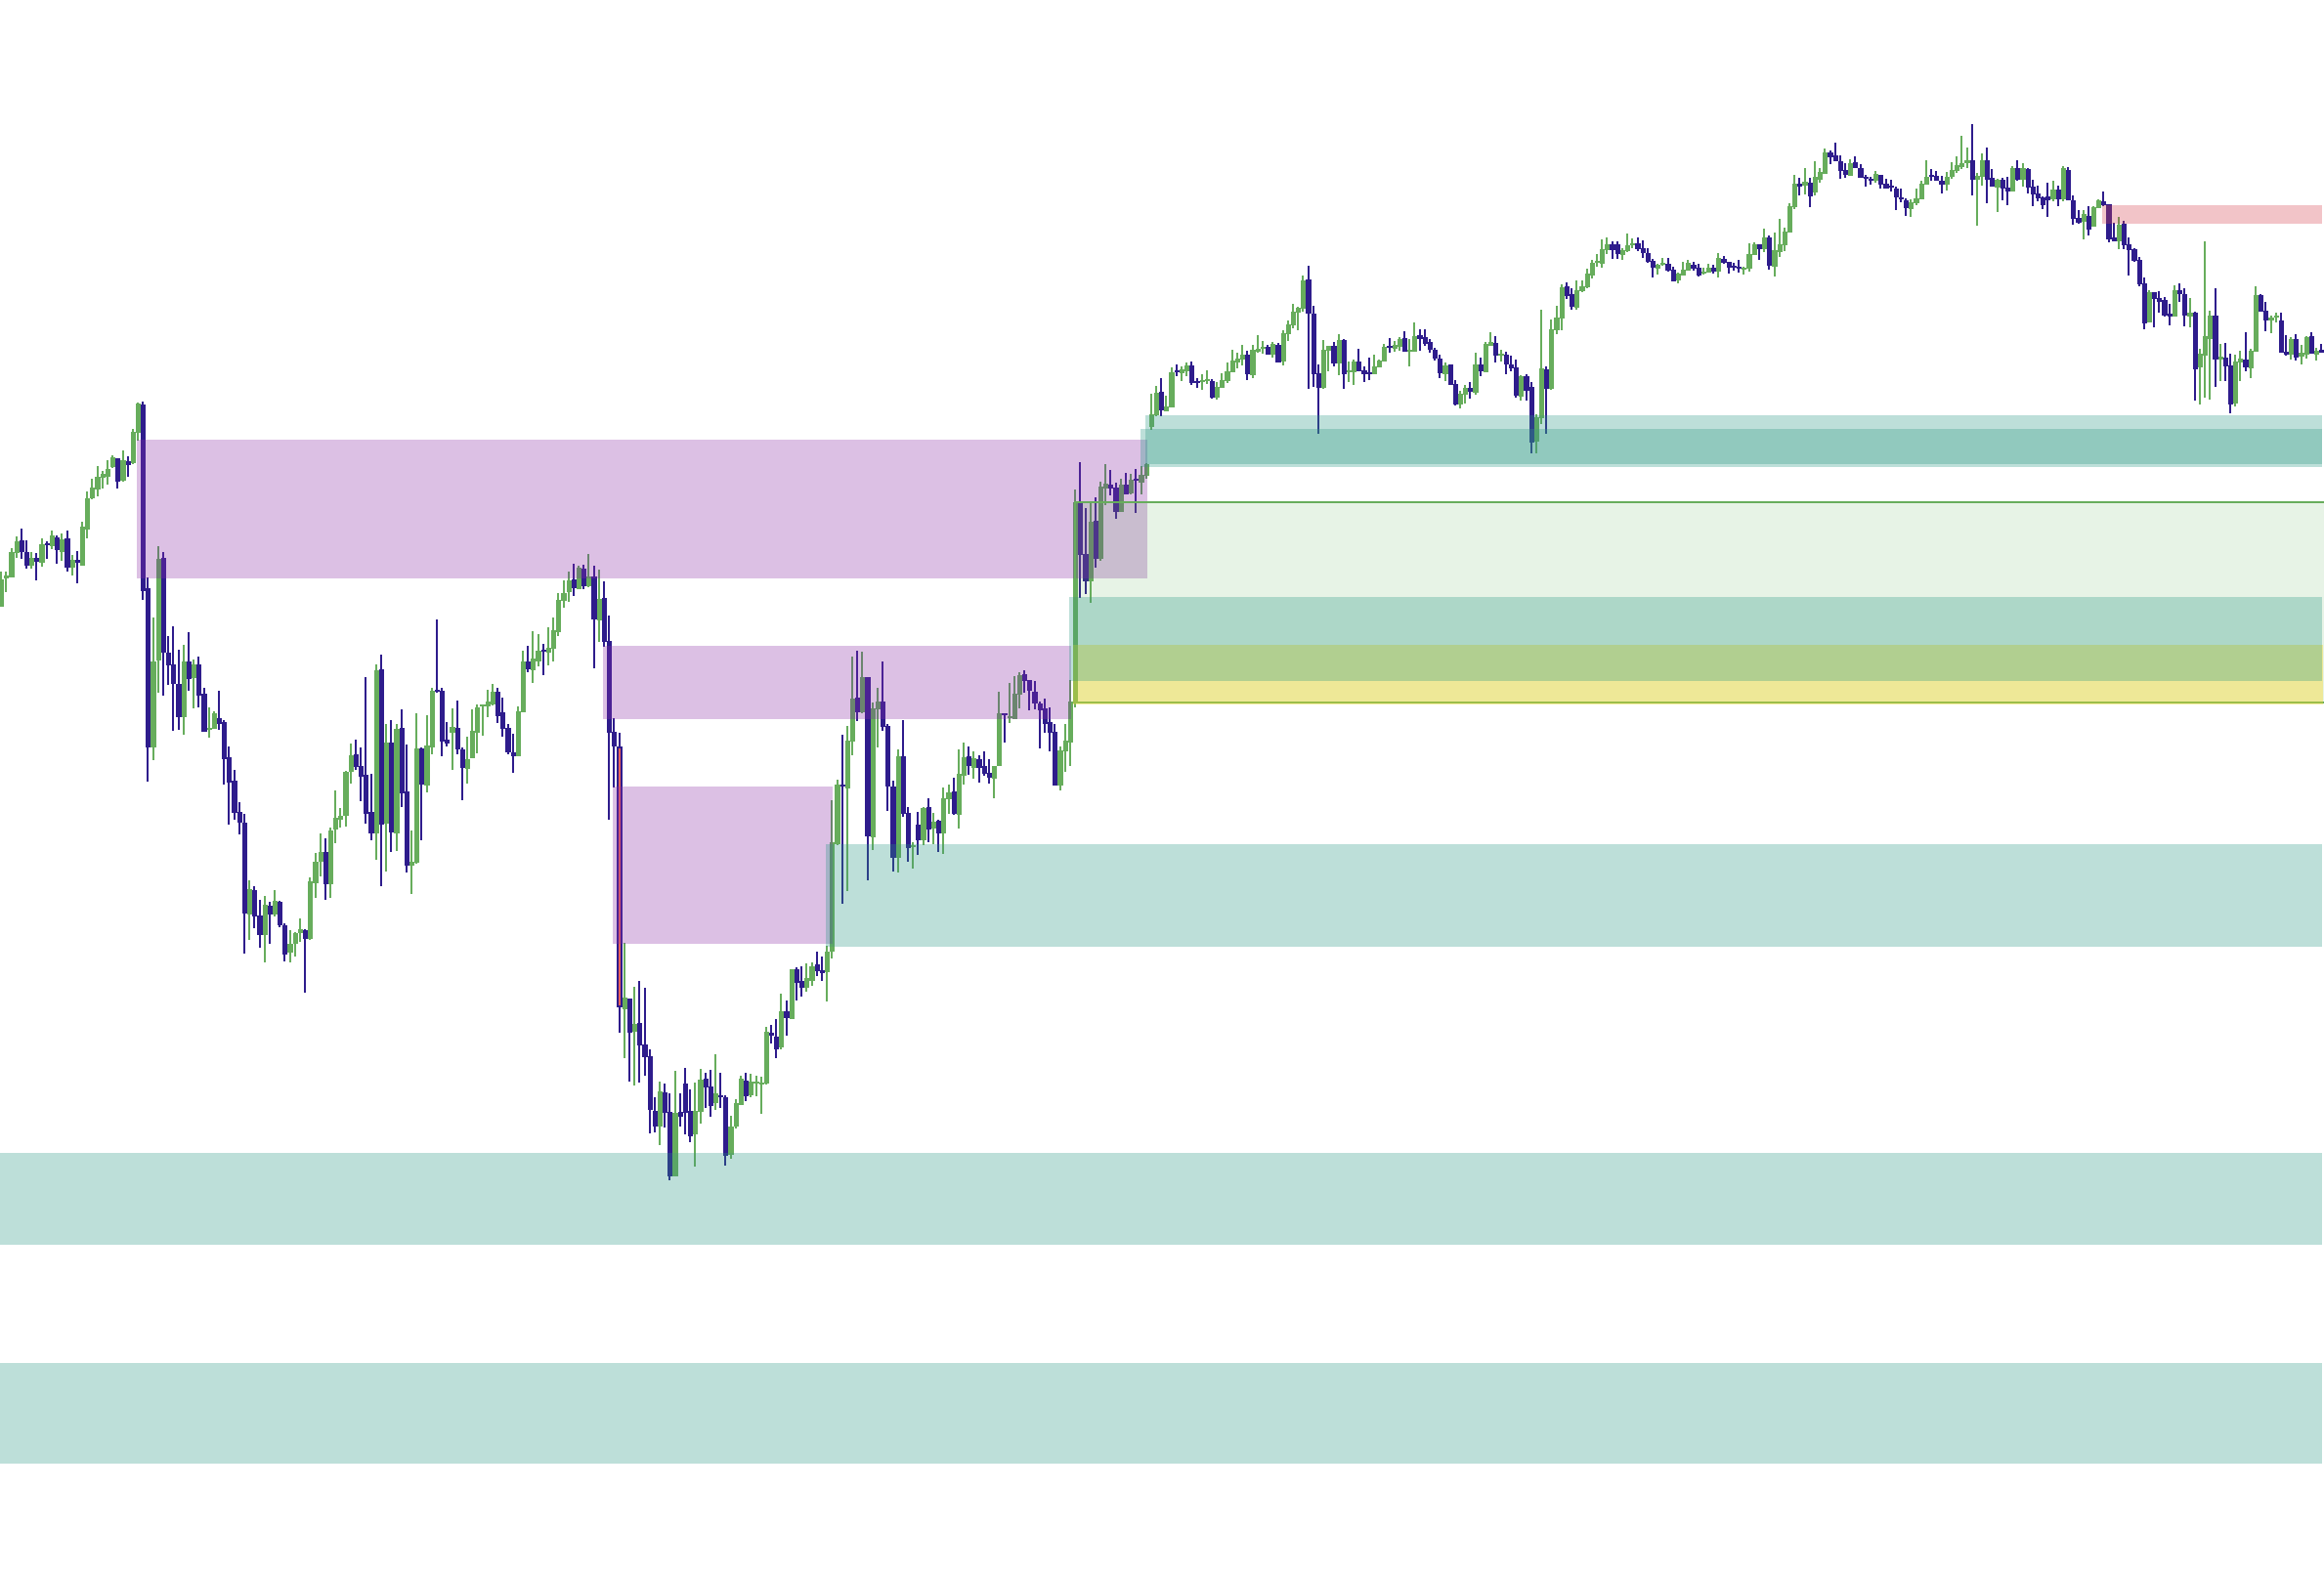
Momentum Gaps blends practical location tools into one script: Impulse Zones identify displacement candles, Fair Value Gaps (FVGs) identify imbalances, and the dedicated Order Block Tool identifies structural supply/demand zones around breaks. Together, they answer a more useful question:
The goal
Identify zones where the market moved with meaningful urgency and left structure behind, then judge whether a later revisit produces rejection, defense, or acceptance. The zone gives you the location; price behavior tells you whether the idea is still valid.
1) Impulse Zones (Displacement Footprints)
An Impulse is detected when a candle combines both participation and expansion through two conditions:
- Volume Strength: current volume exceeds a volume average by a user-defined multiplier.
- Move Size: the candle body is larger than ATR by a user-defined multiplier.
What the impulse zone represents
The script can draw a filled zone between the candle’s open and close. This is the displacement area—the body of the move that can become a useful reference if price revisits it later. A revisit is not guaranteed, and a touch alone is not an entry.
Delete When Closed Through (default ON)
If price later closes fully through the impulse zone, the script can remove it automatically. That close-through is meaningful because it shows the original displacement area is no longer being respected in the same way, while also keeping the chart focused on active structure.
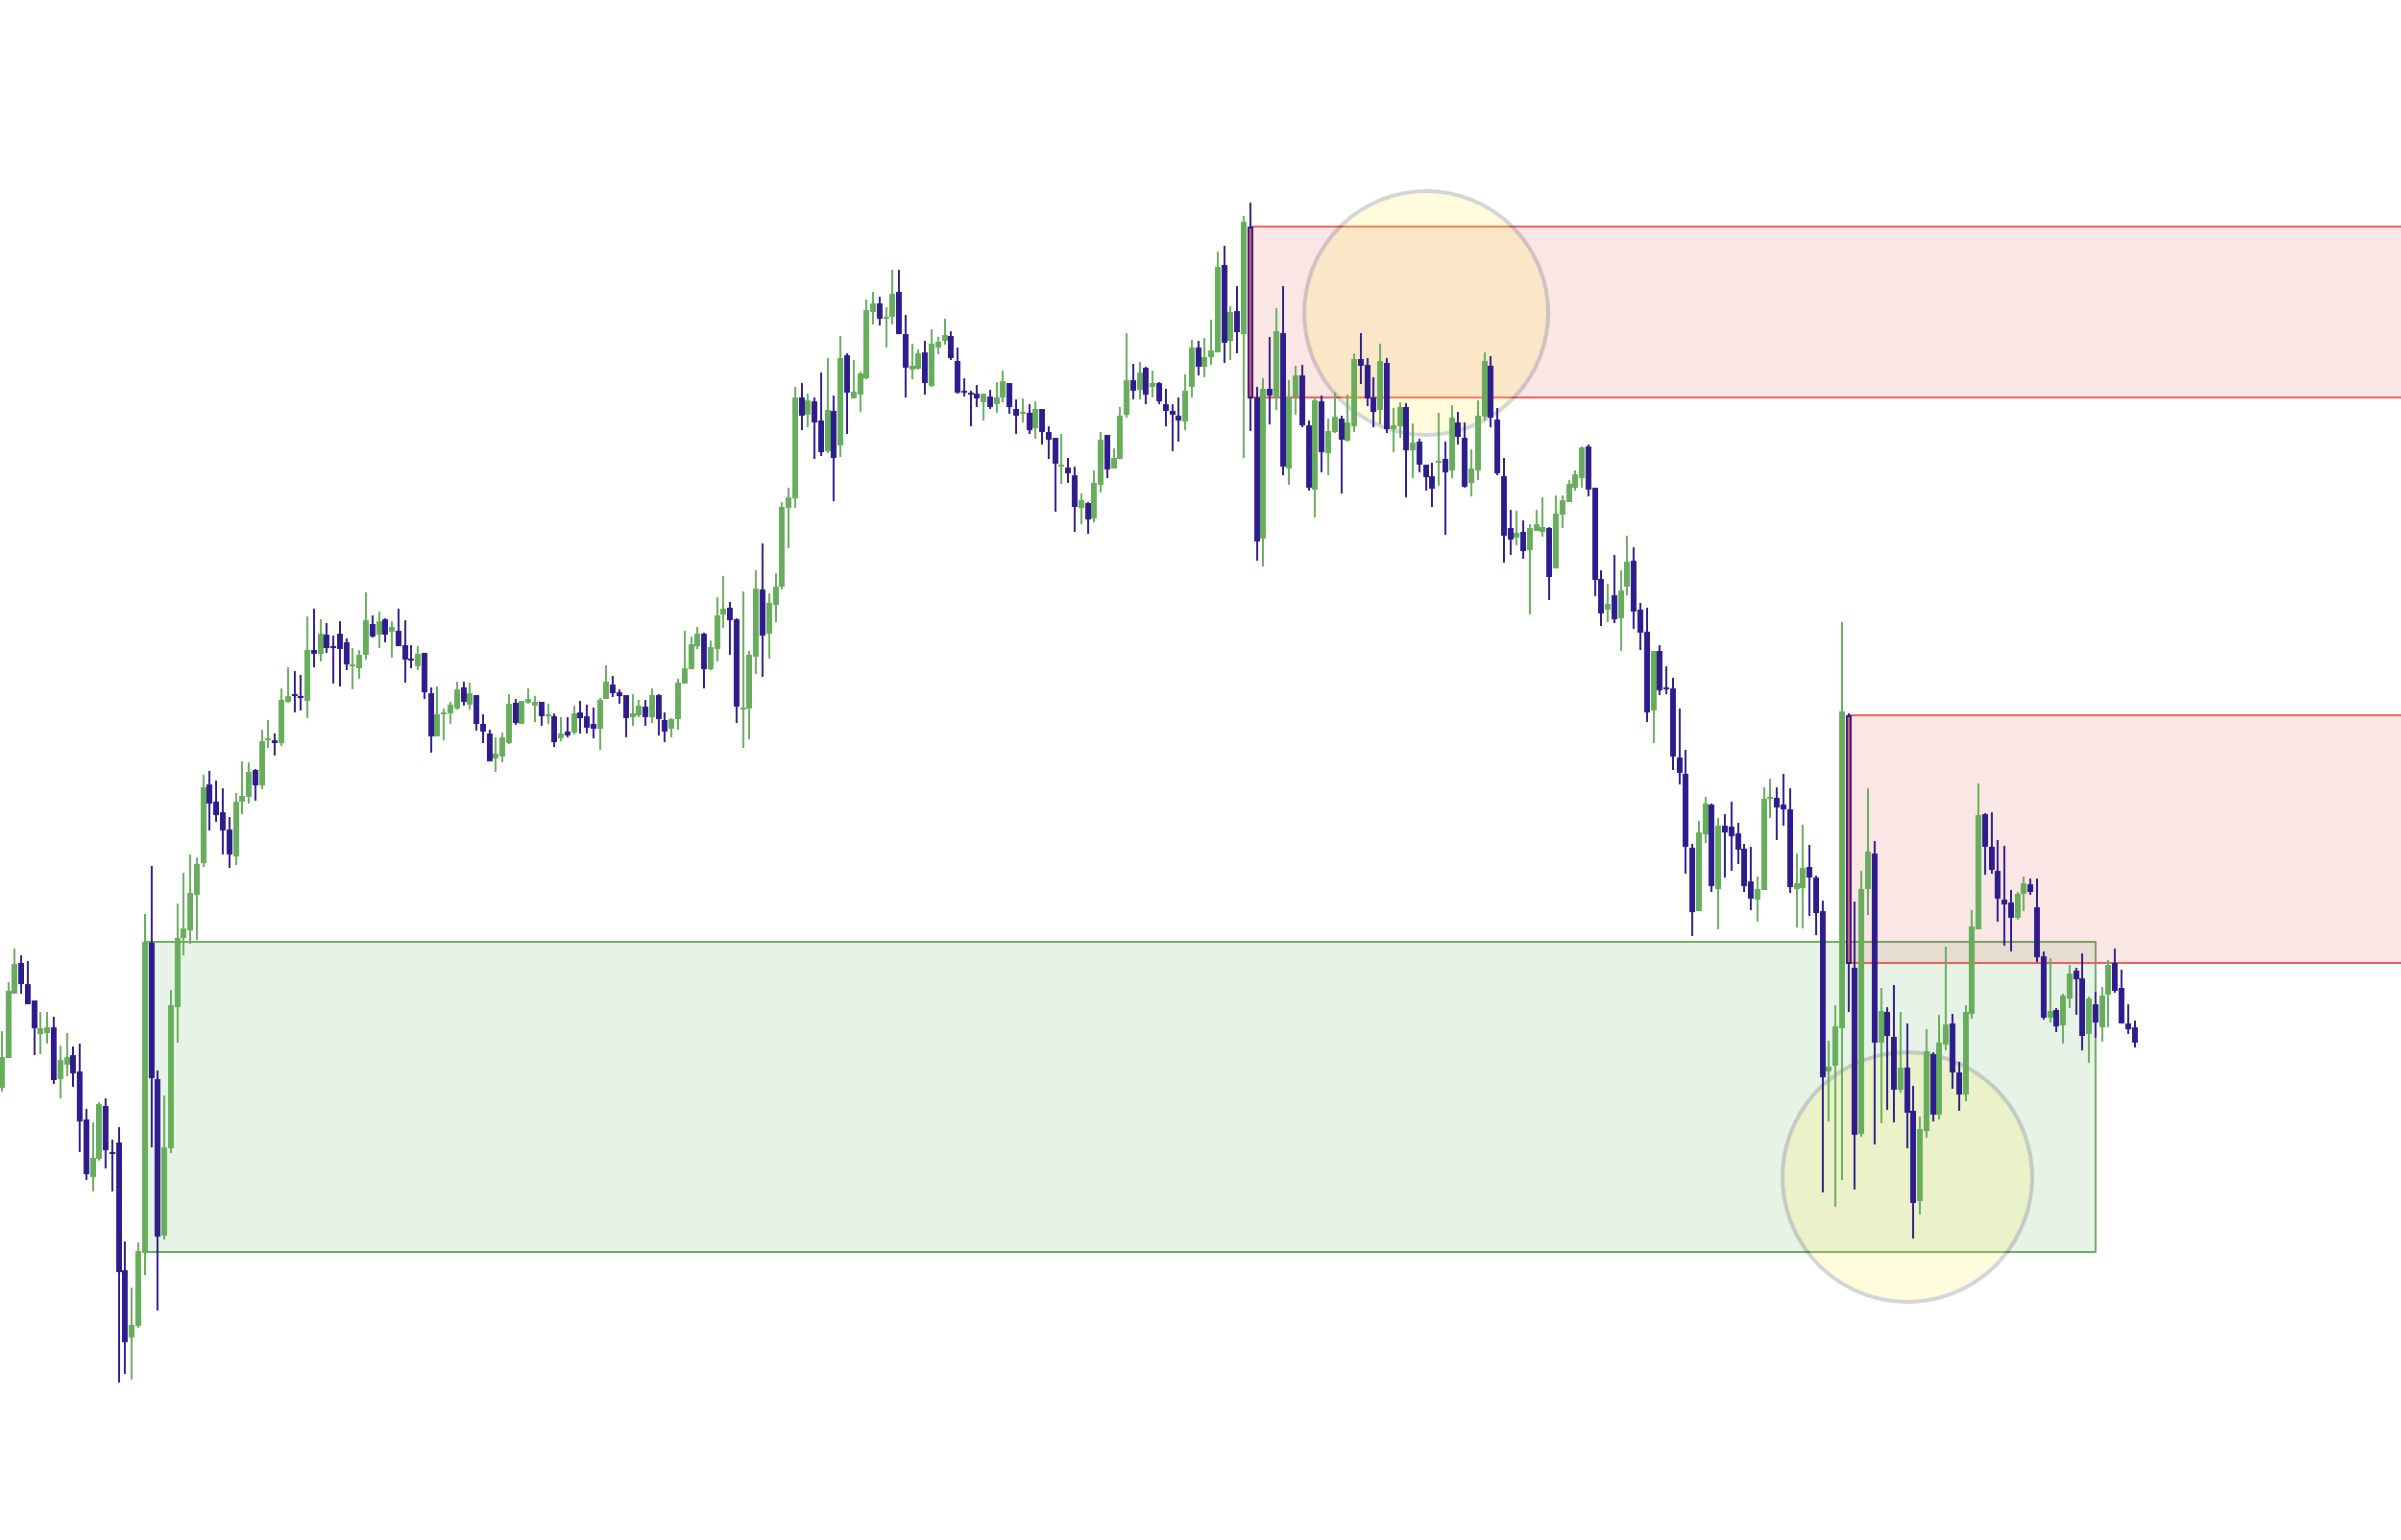
Example 2: Price revisits an impulse zone (re-entry context)
2) FVG Pro (Fair Value Gaps + Quality Filters)
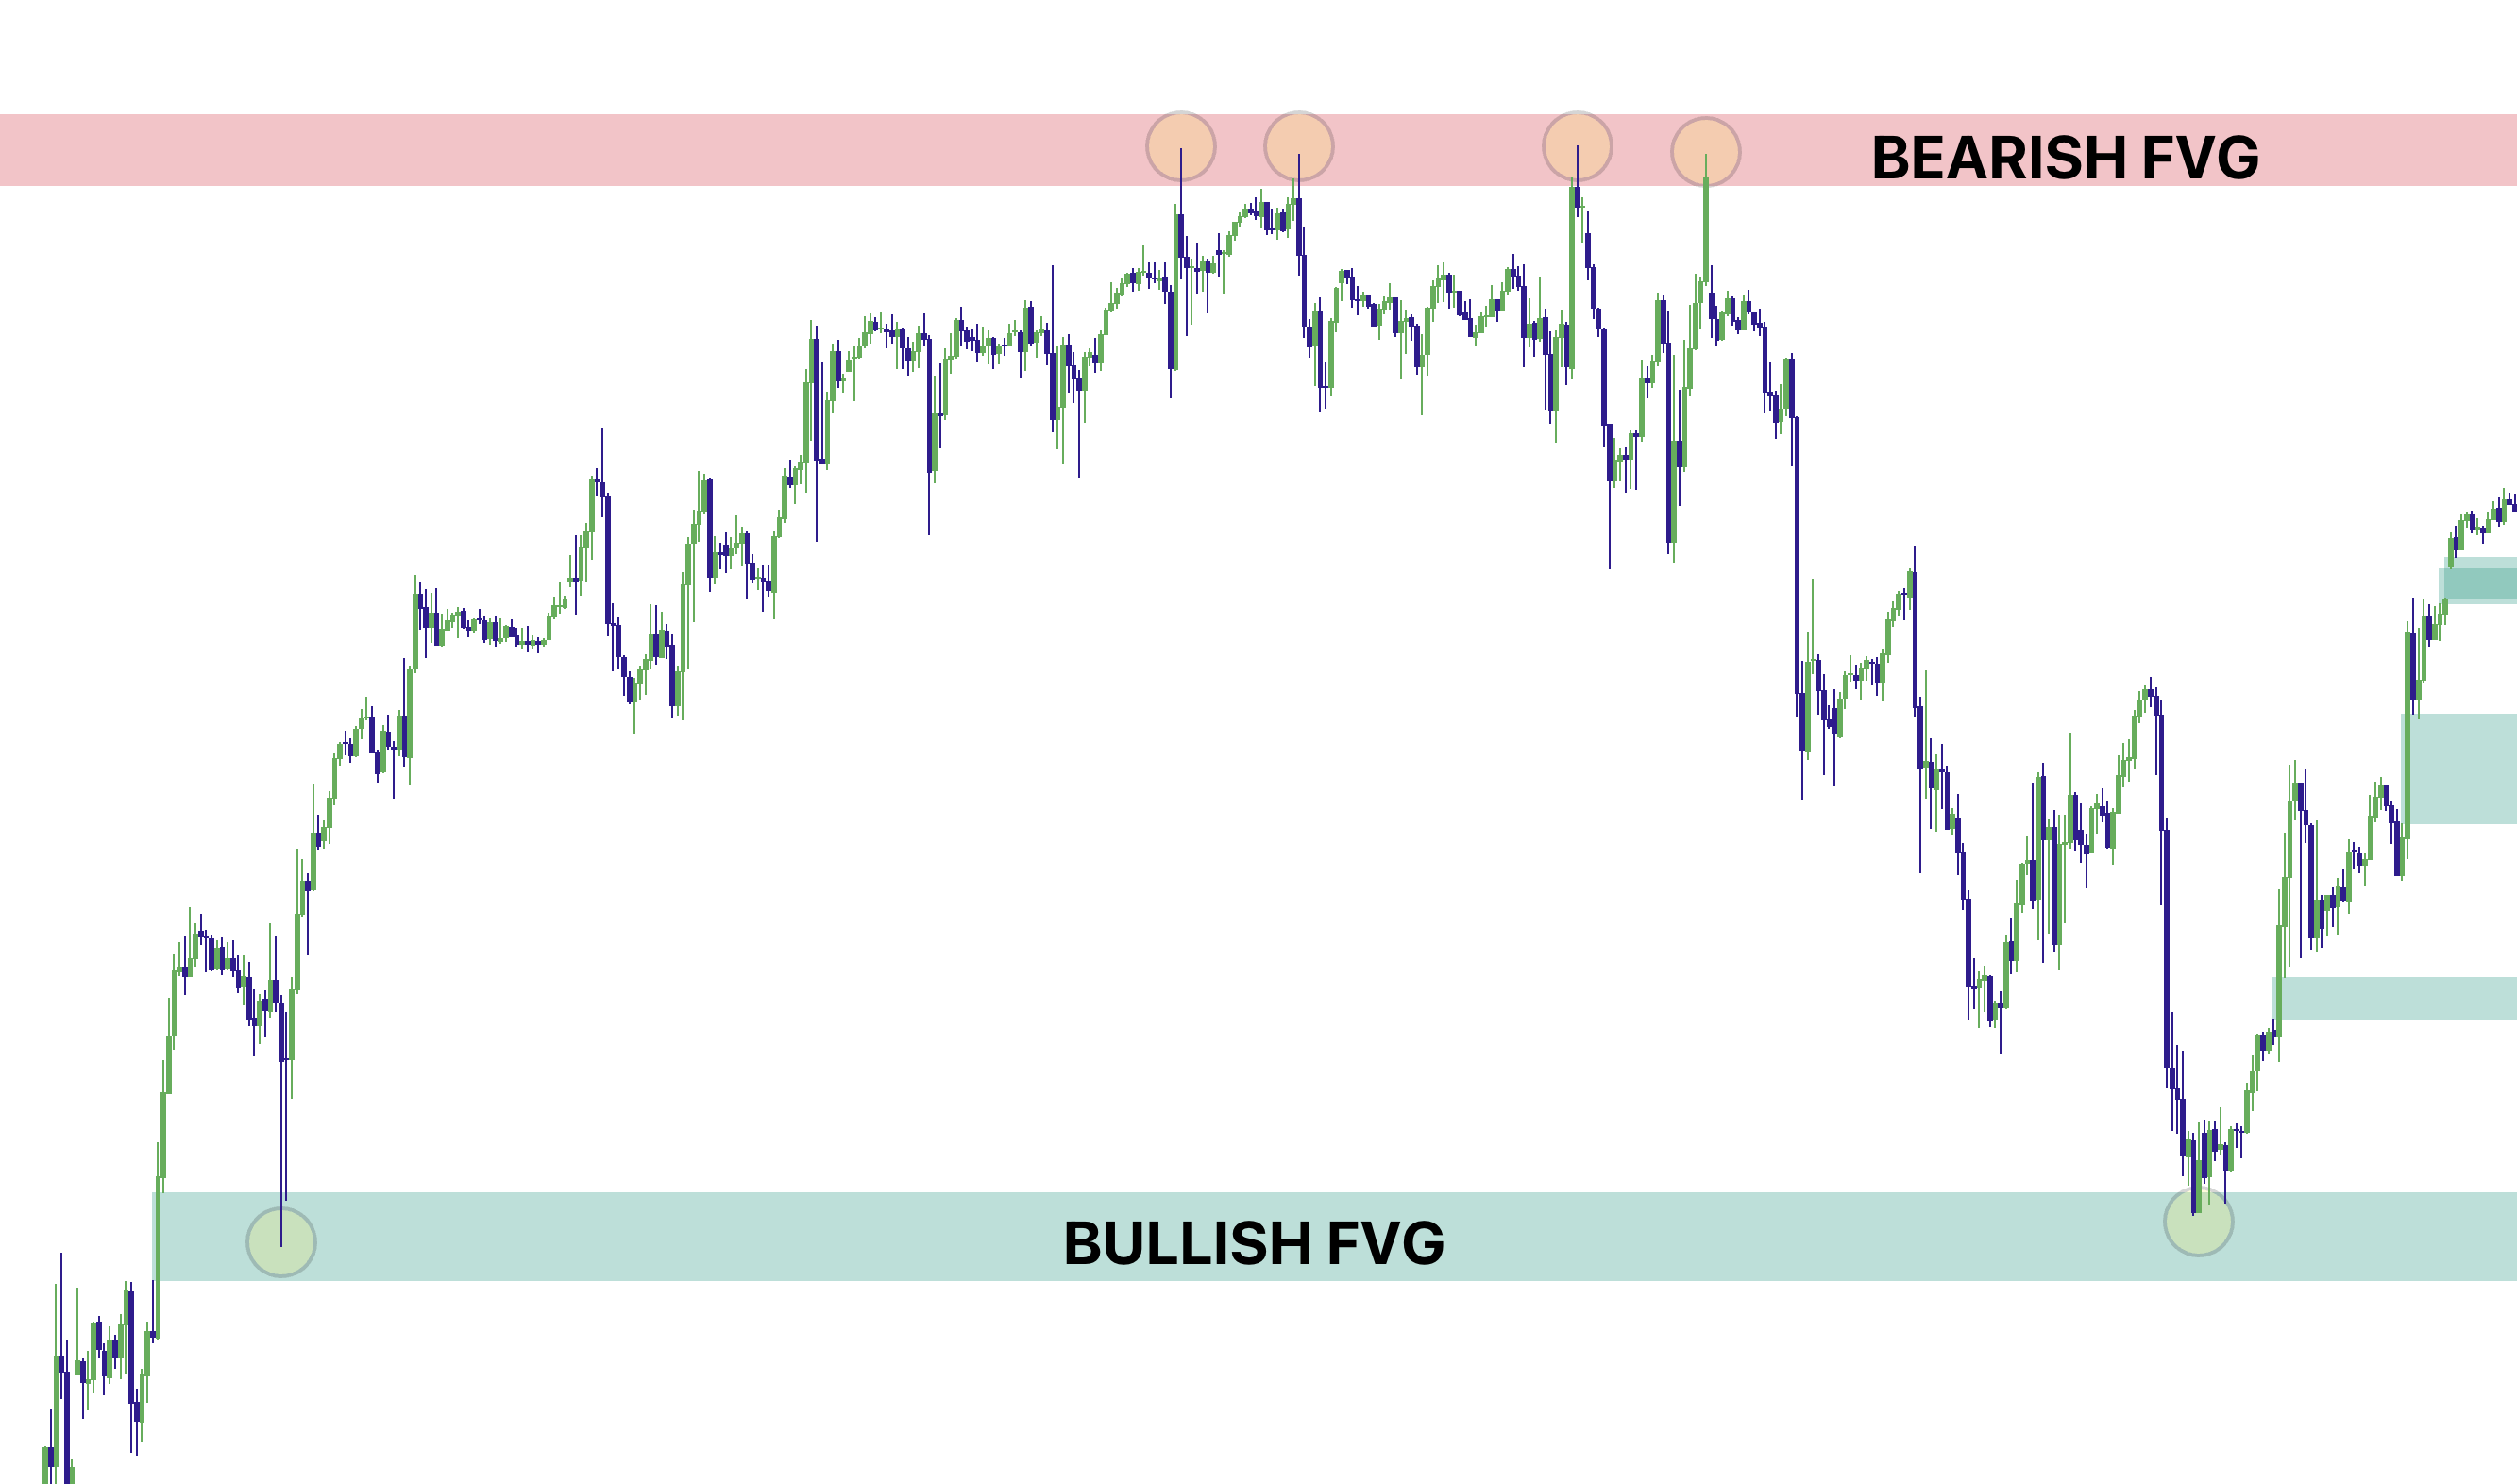
The FVG engine detects classic 3-candle gaps (imbalances) and lets you control how selective the script is. The key is that not every gap has the same structural value, so the filtering modes help you reduce weaker FVGs and focus on cleaner displacement.
Filtering modes (how selective you want it)
- All FVG: shows every detected gap for the broadest baseline view.
- Only FVG in Trend: focuses on gaps aligned with the higher timeframe trend filter.
- Strict: adds candle body-strength requirements to reduce weaker gaps.
- Super-Strict: can additionally require volume confirmation for the highest selectivity in the FVG engine.
Trend filter (optional)
When enabled, the script checks a higher timeframe EMA-based trend context. This helps keep the FVG map aligned with broader direction, which can be especially useful when you want to use gaps as continuation structure on fast charts.
Session filter and displacement filter (optional)
- Session Filter: only detects new FVGs during a session window you define.
- Displacement Filter: only detects gaps created by candles that meet a minimum body-size and body-strength threshold.
Example 3: Clean bullish + bearish FVGs on the chart
3) Order Blocks Tool (ICT Style + Swing-Extreme Zones)
The Order Block Tool adds a structural supply/demand layer on top of Momentum Gaps. It runs alongside impulses and FVGs to show possible origin zones around structural breaks, giving you another reference for future retests without treating every block as an automatic reversal.
How to use Order Blocks (the right way)
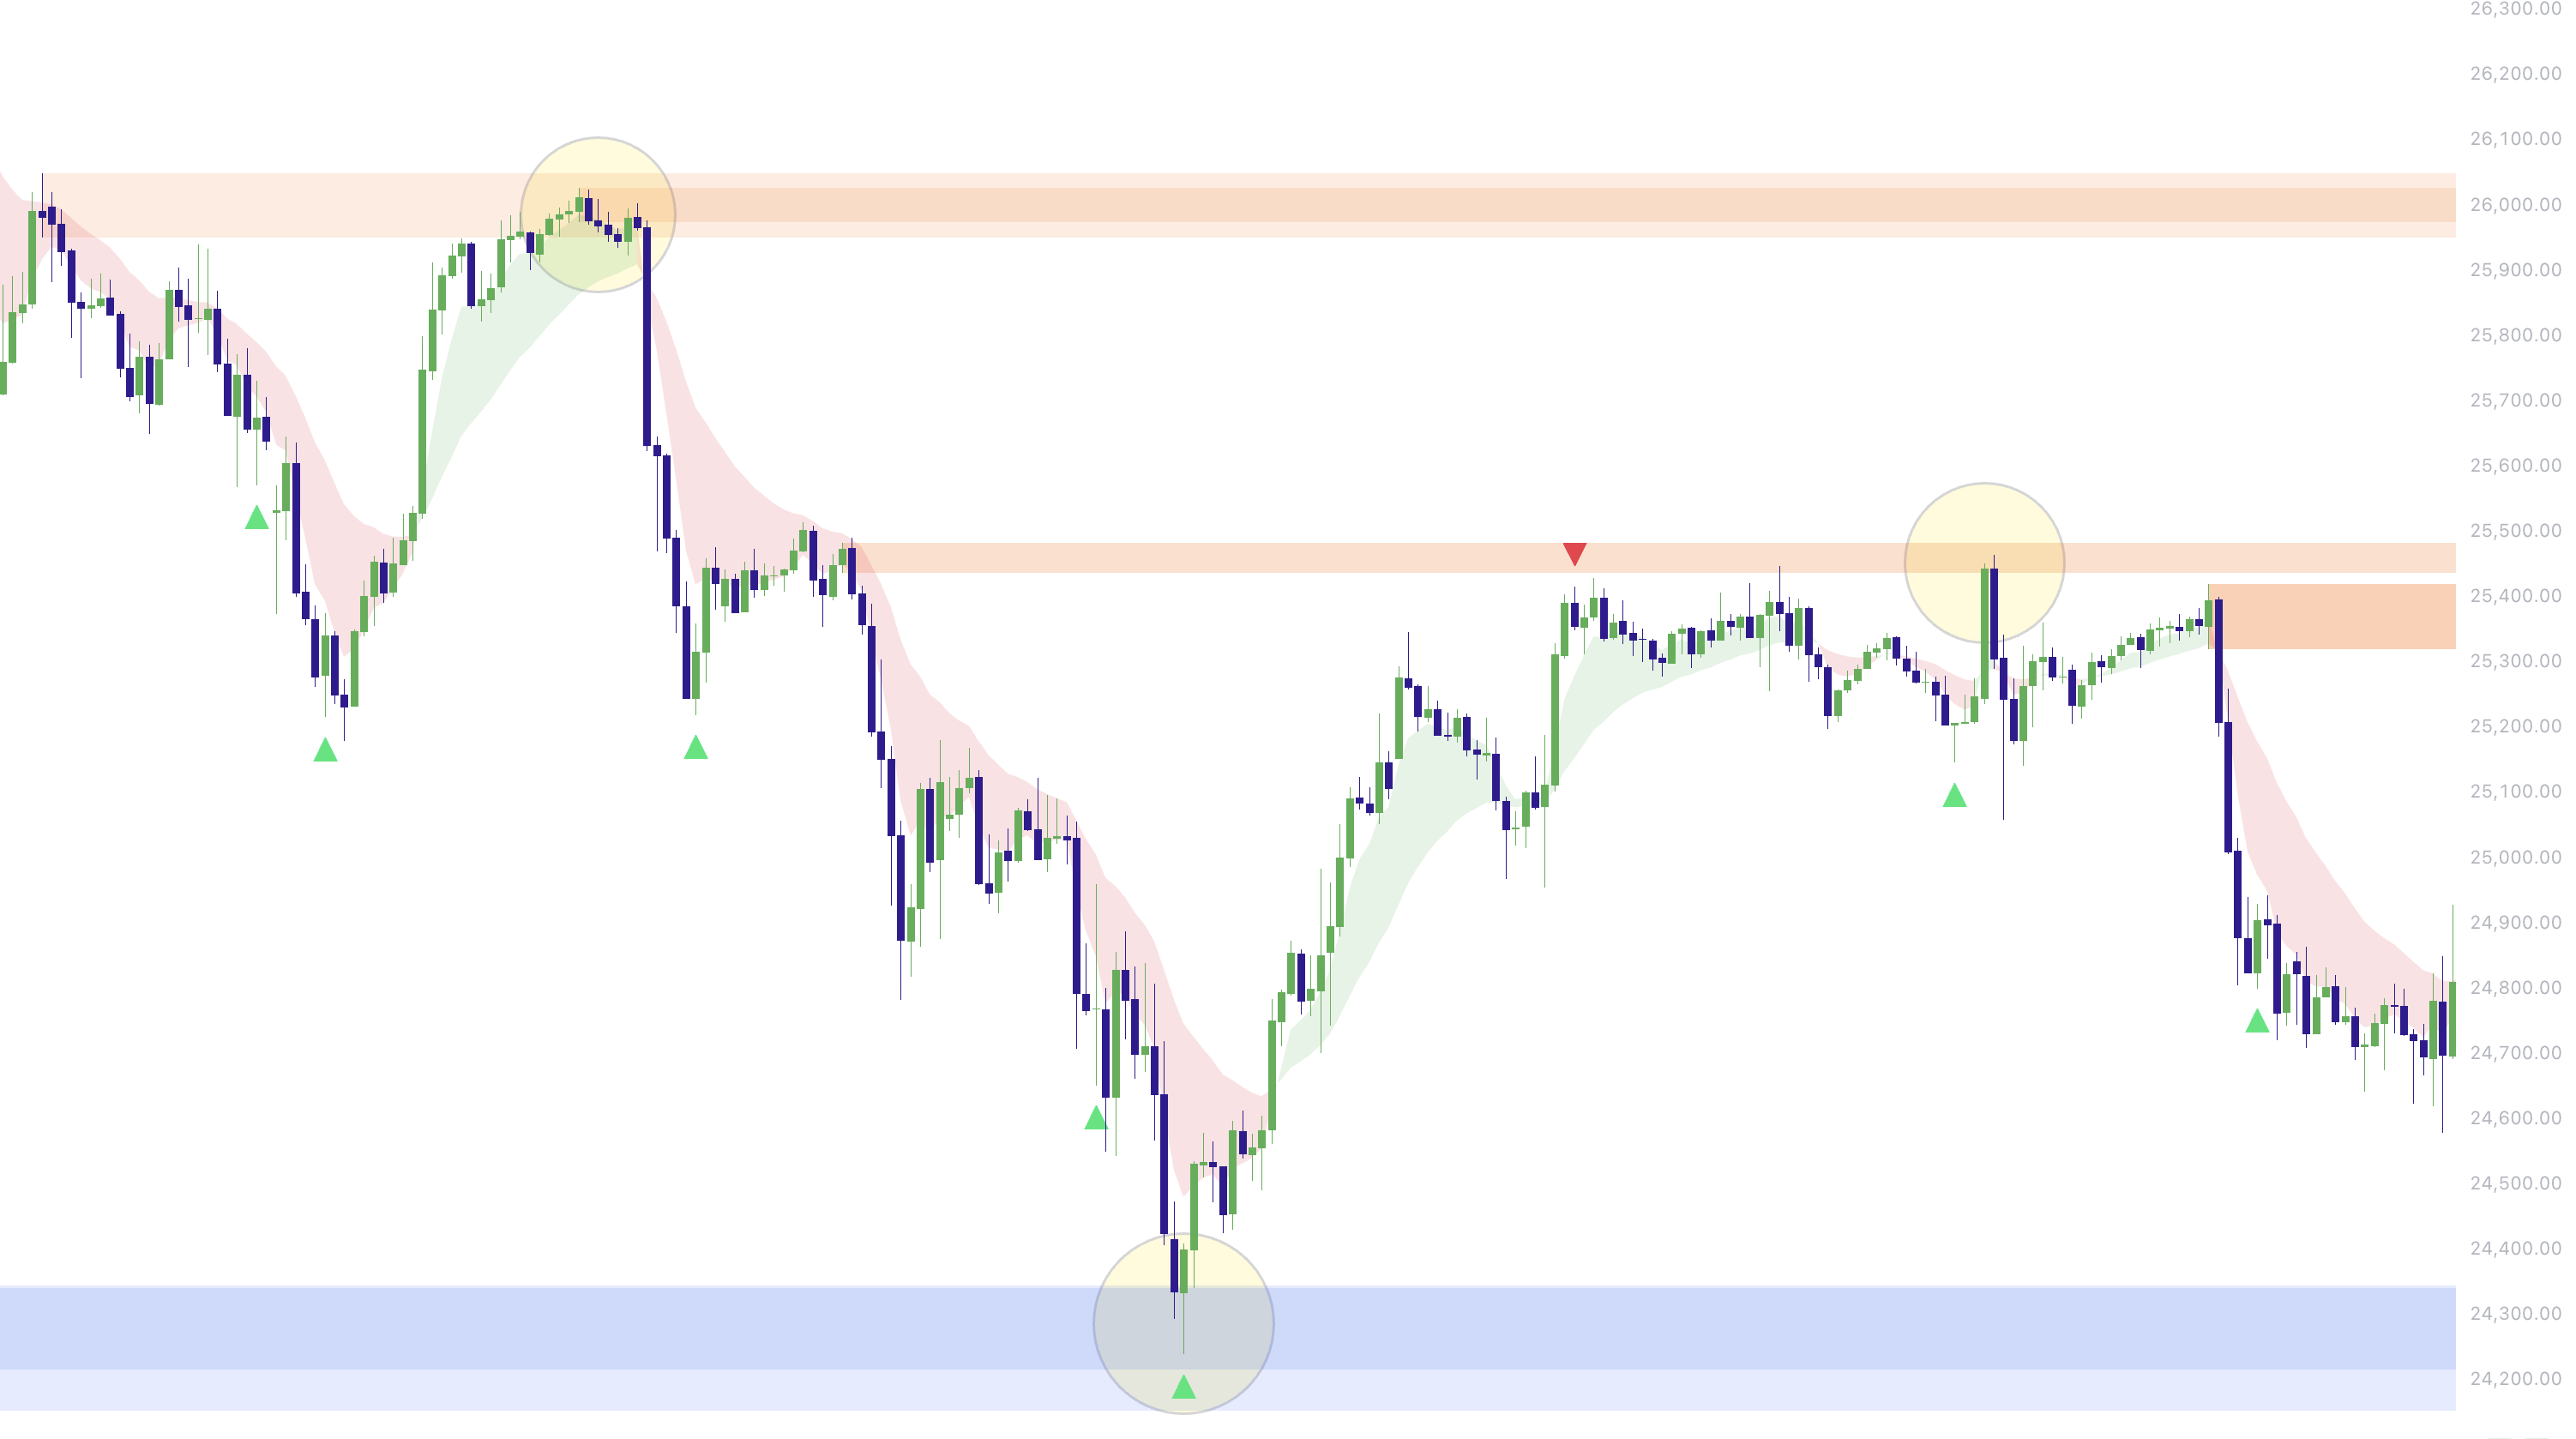
Order Blocks are not auto entries. Treat them as location. When price revisits an order block, first decide whether the area is holding. For a reaction setup, look for rejection before using your Elev8+ Reversal trigger; clean acceptance through the block argues against forcing the original reversal idea.
Two independent OB engines (run either one, or both)
- ICT Style Order Blocks: marks the last opposite-color candle before the break (bullish OB = last bearish candle before the up-break; bearish OB = last bullish candle before the down-break). This is the classic last-opposite-candle approach to defining the block.
- Swing-Extreme Order Blocks: marks the extreme candle in the swing segment before the break (bullish OB = lowest extreme; bearish OB = highest extreme). This can identify a broader structural origin even when the extreme candle is not the classic opposite color.
Clean invalidation (close-through only)
By default, order blocks are only removed when price closes beyond the zone. Wicks can test the area without removing it; the close-through is the stronger evidence that price has accepted beyond the block.
Optional displacement filter (for higher quality OBs)
If you want fewer, cleaner OBs, enable the optional Displacement Filter. This requires the break candle to have a minimum body size vs ATR, helping separate stronger structural breaks from smaller, noisier moves.
Example 4: ICT Style + Swing-Extreme order blocks plotted together
4) IFVG (Inverse FVG): When the Gap Fails
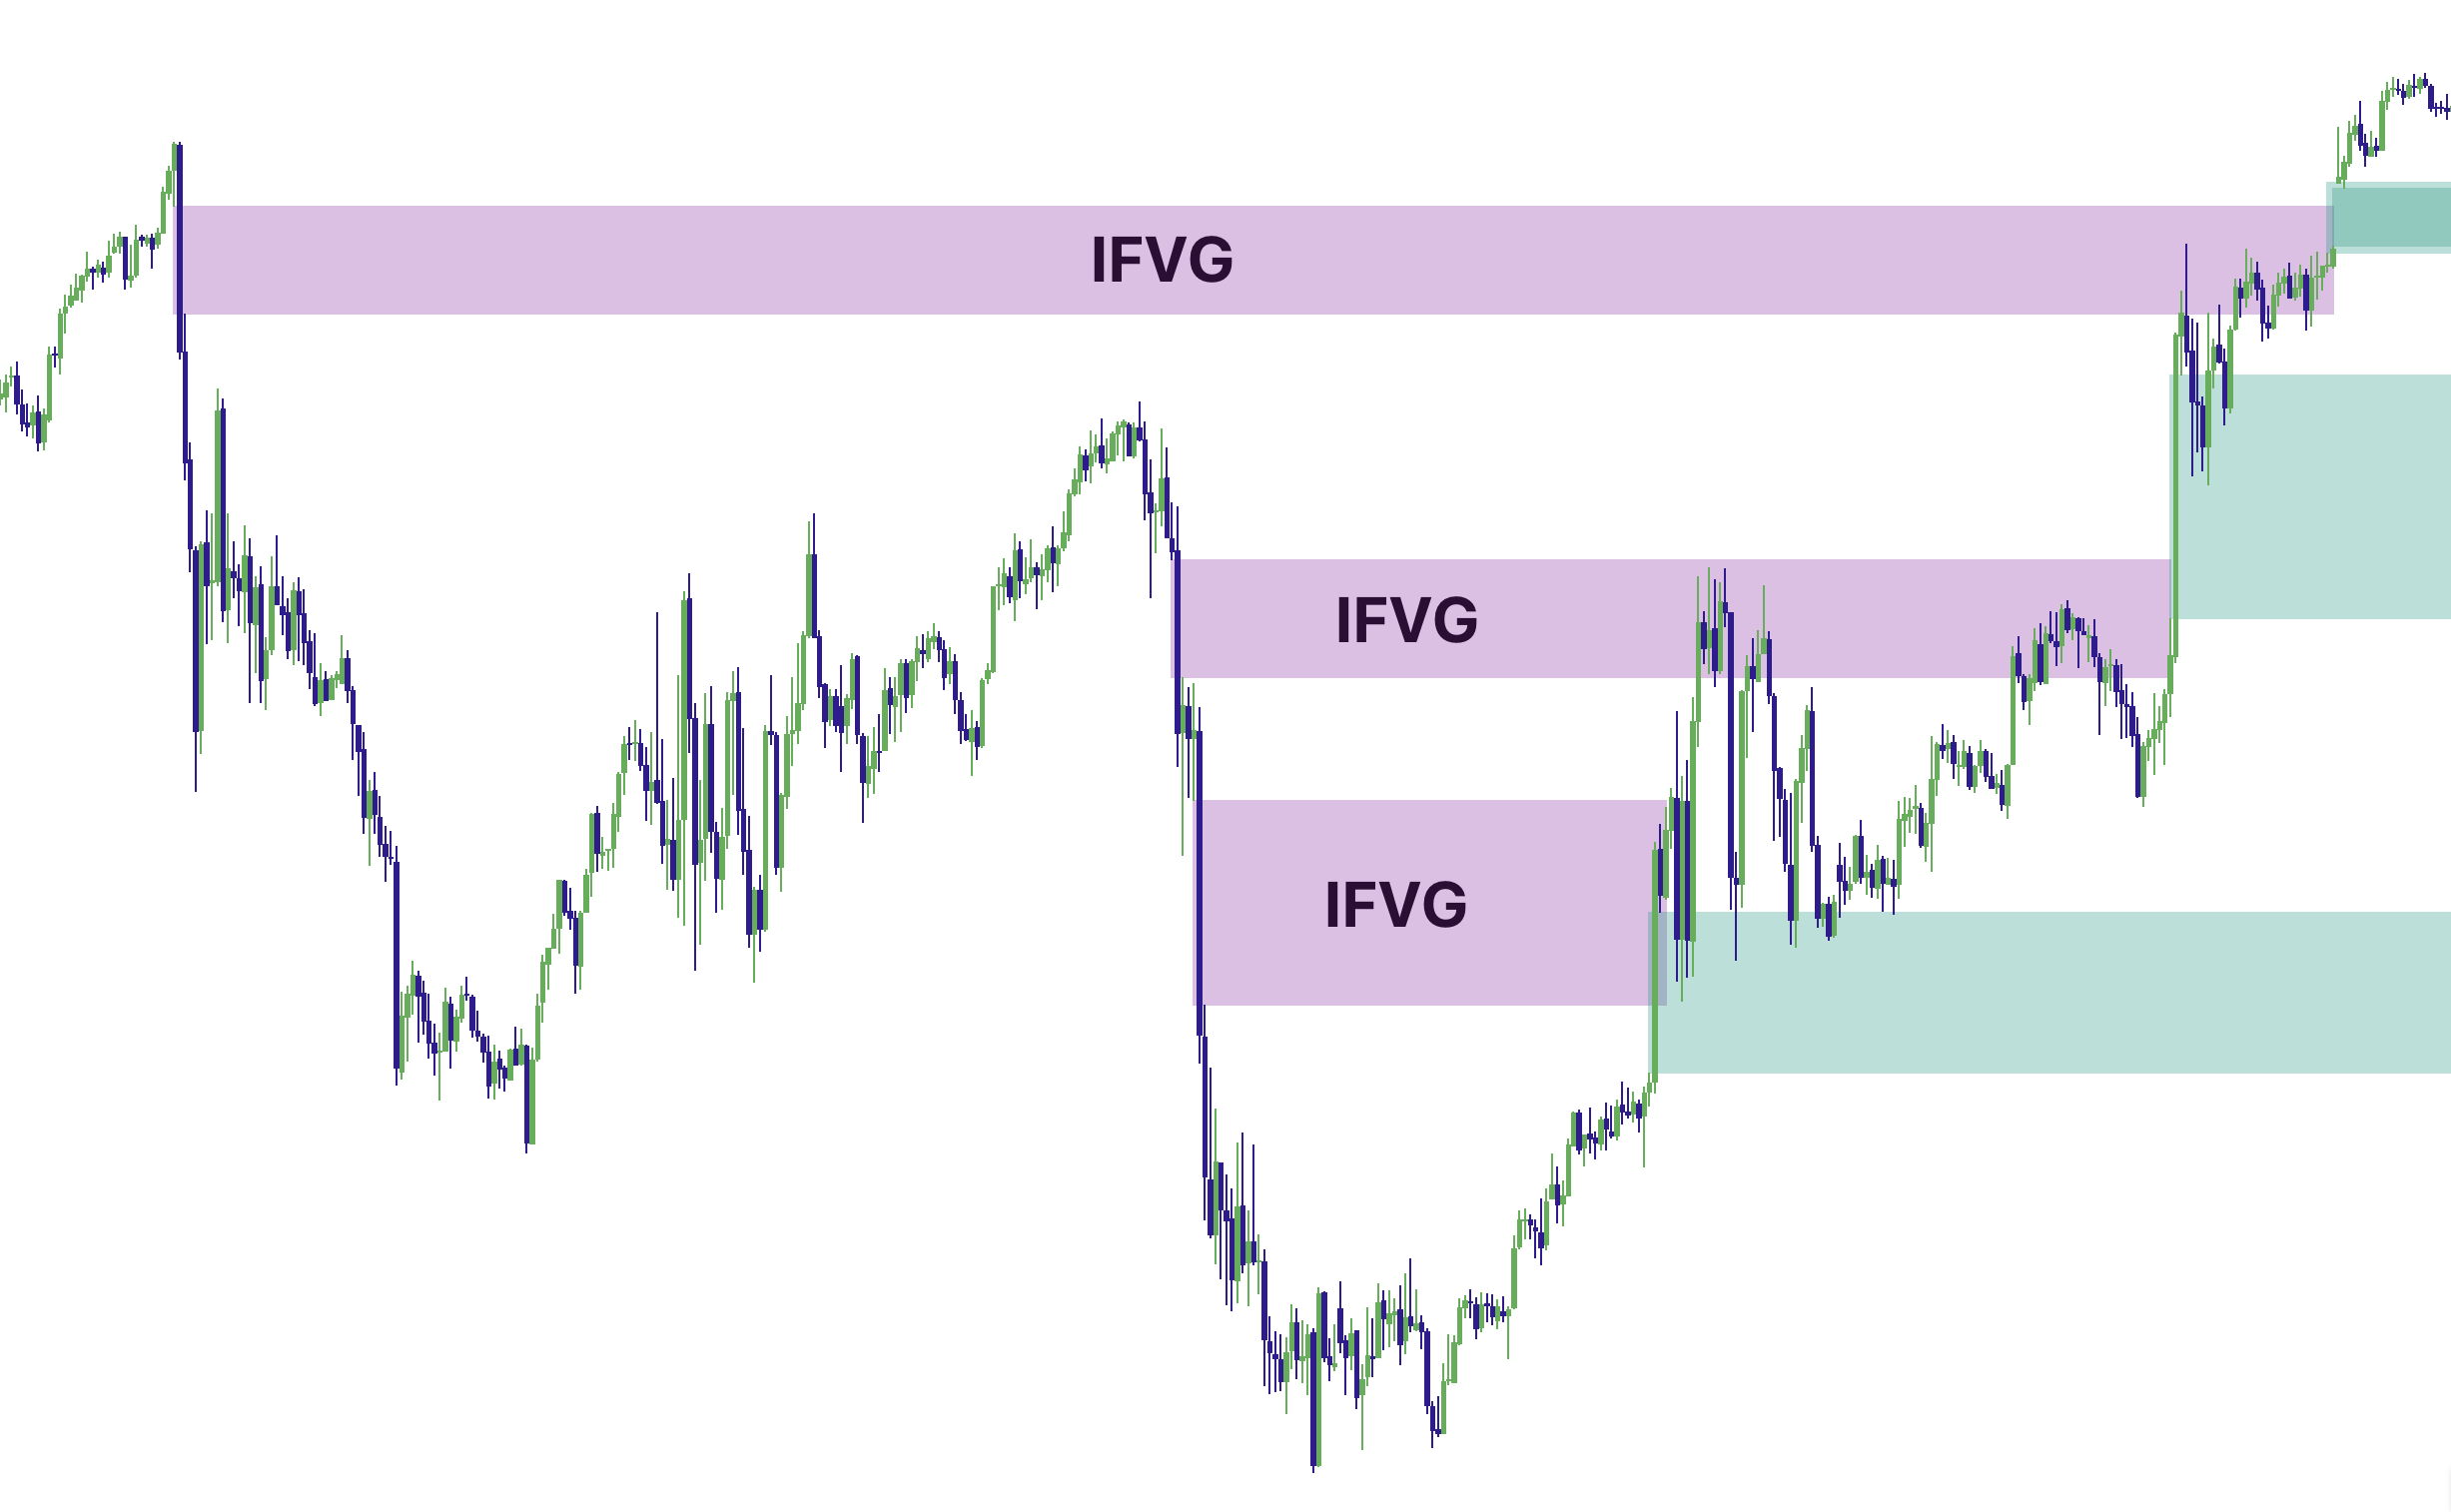
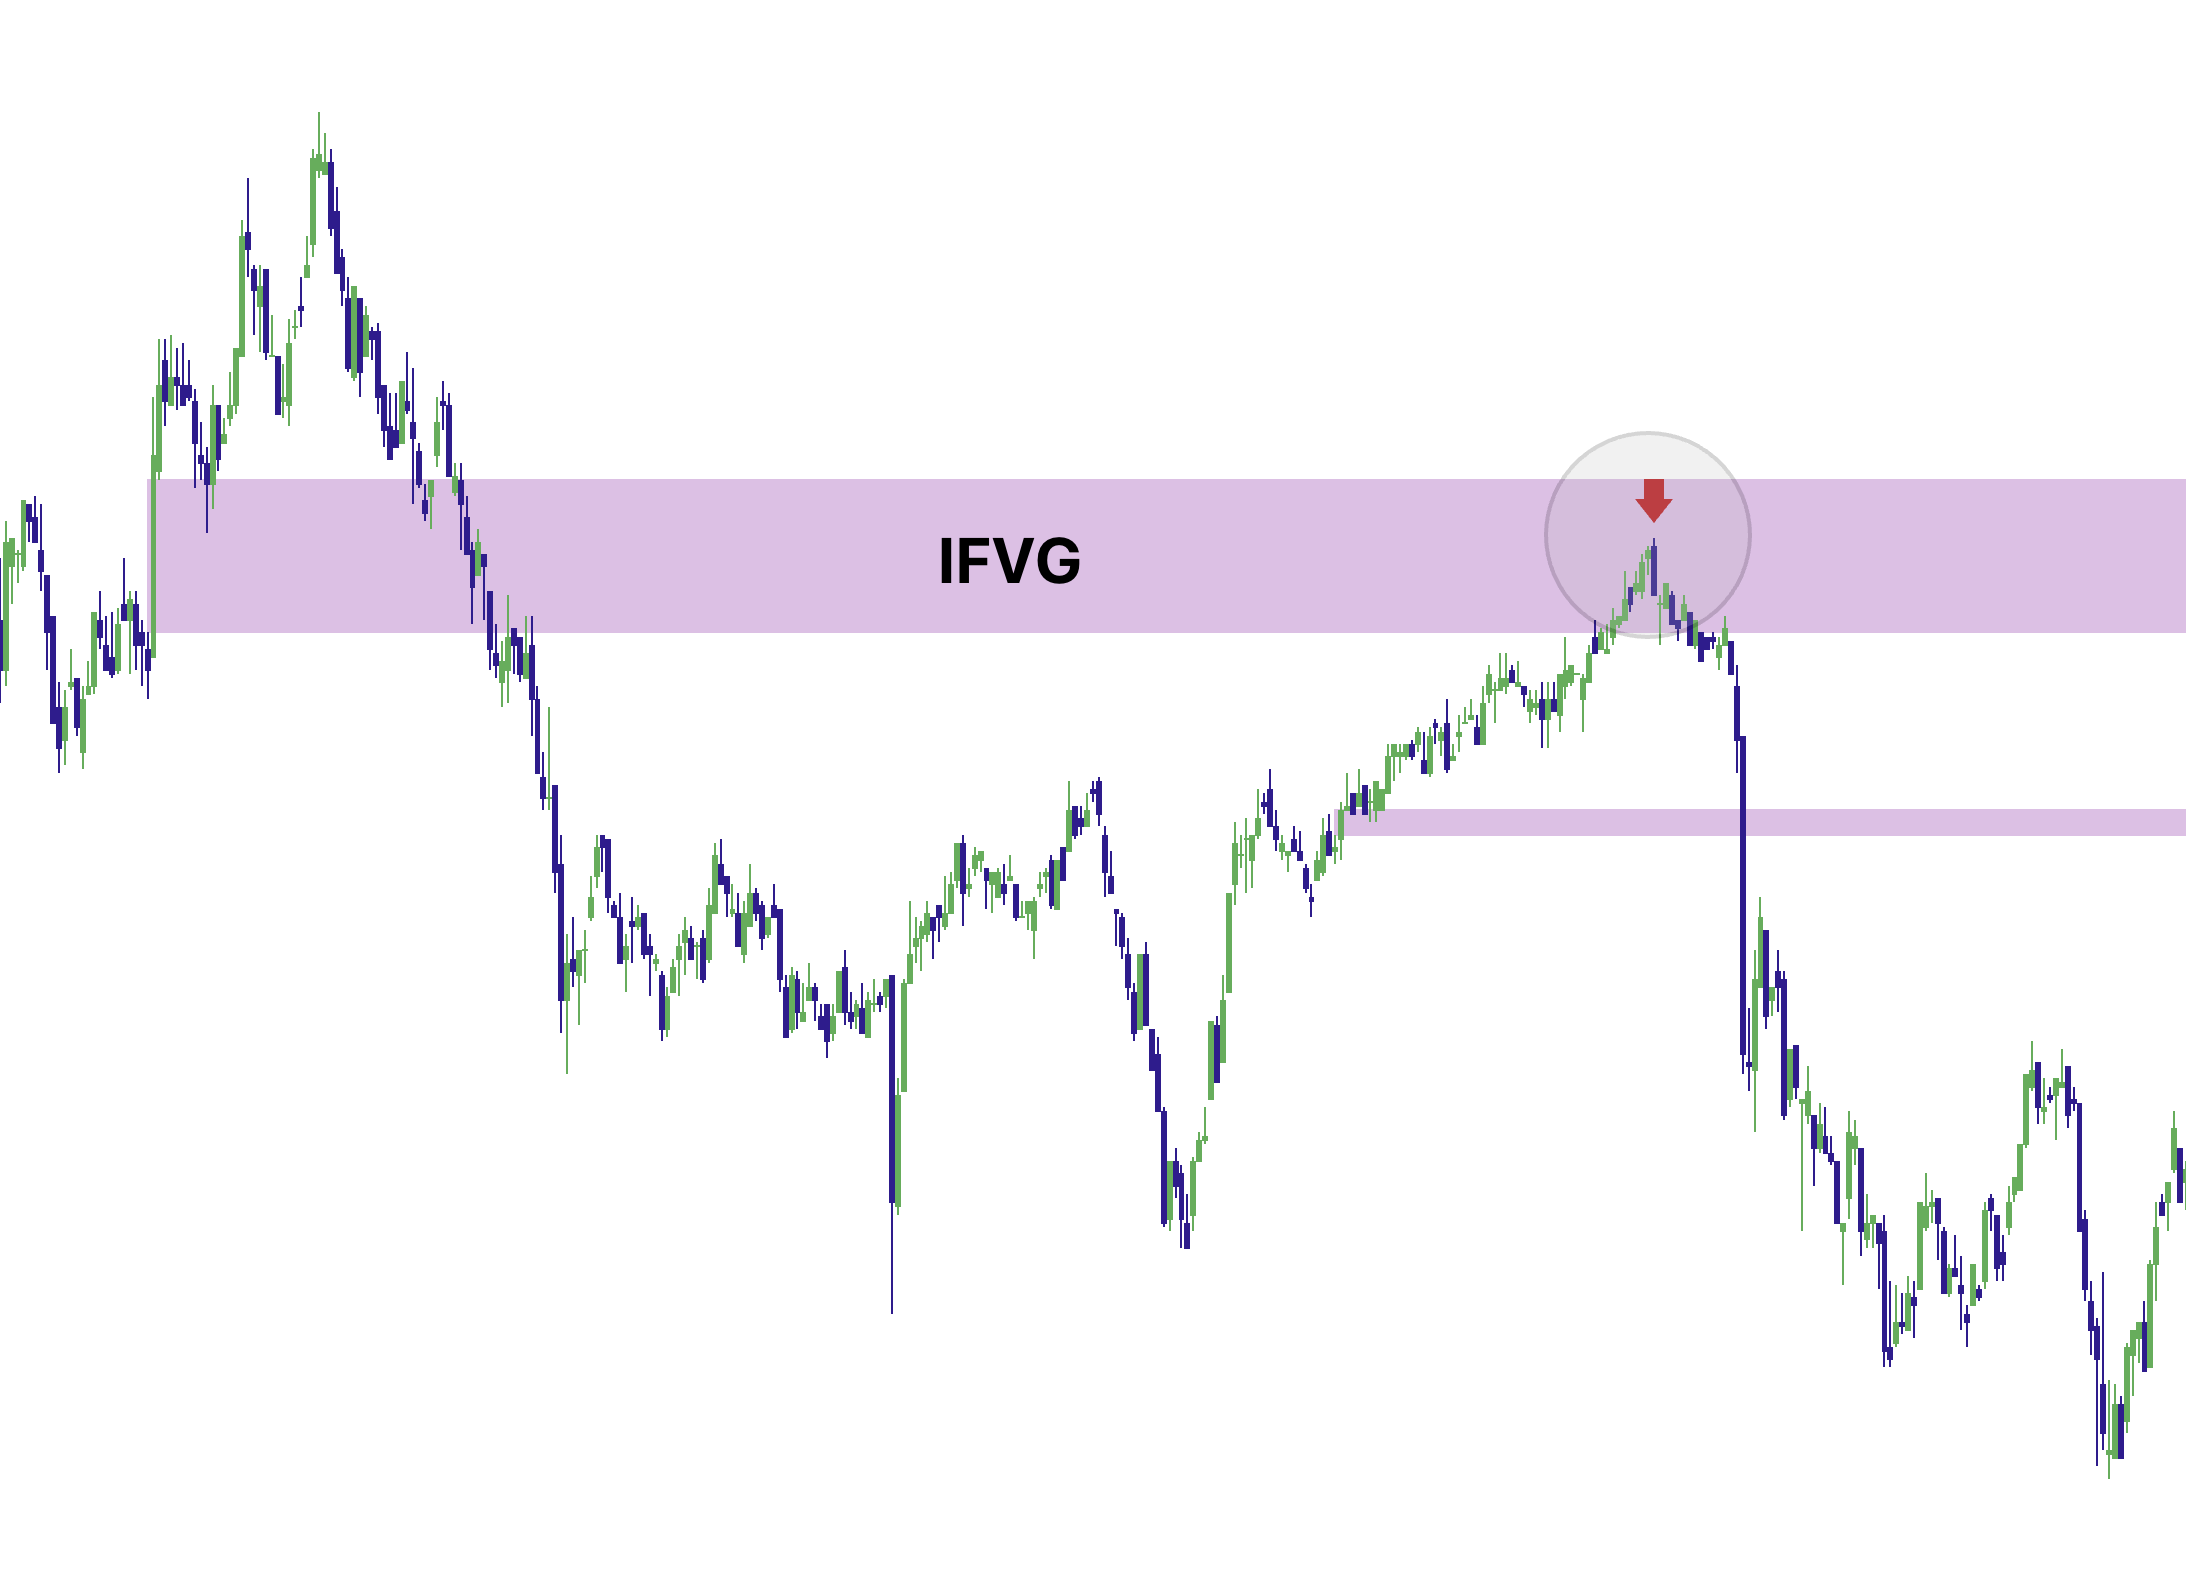
When price closes fully through an active FVG, Momentum Gaps can flip that zone into an Inverse FVG (IFVG) (default purple). This creates a clear state change: the original gap failed to hold, price accepted through it, and the same area can now be monitored as a potential flip or retest zone from the opposite side.
Cleaner visibility controls (so charts stay readable)
IFVGs can be managed in a clean, user-friendly way:
- Show inverse FVGs (IFVG)? When OFF, IFVG zones are removed (not shown).
- Extend IFVG forward? When OFF (default), IFVGs remain where they occurred but do not keep extending right.
Example 5: FVG flips into IFVG (purple) after a close-through
5) Confluence Zones: Impulse + FVG Overlap
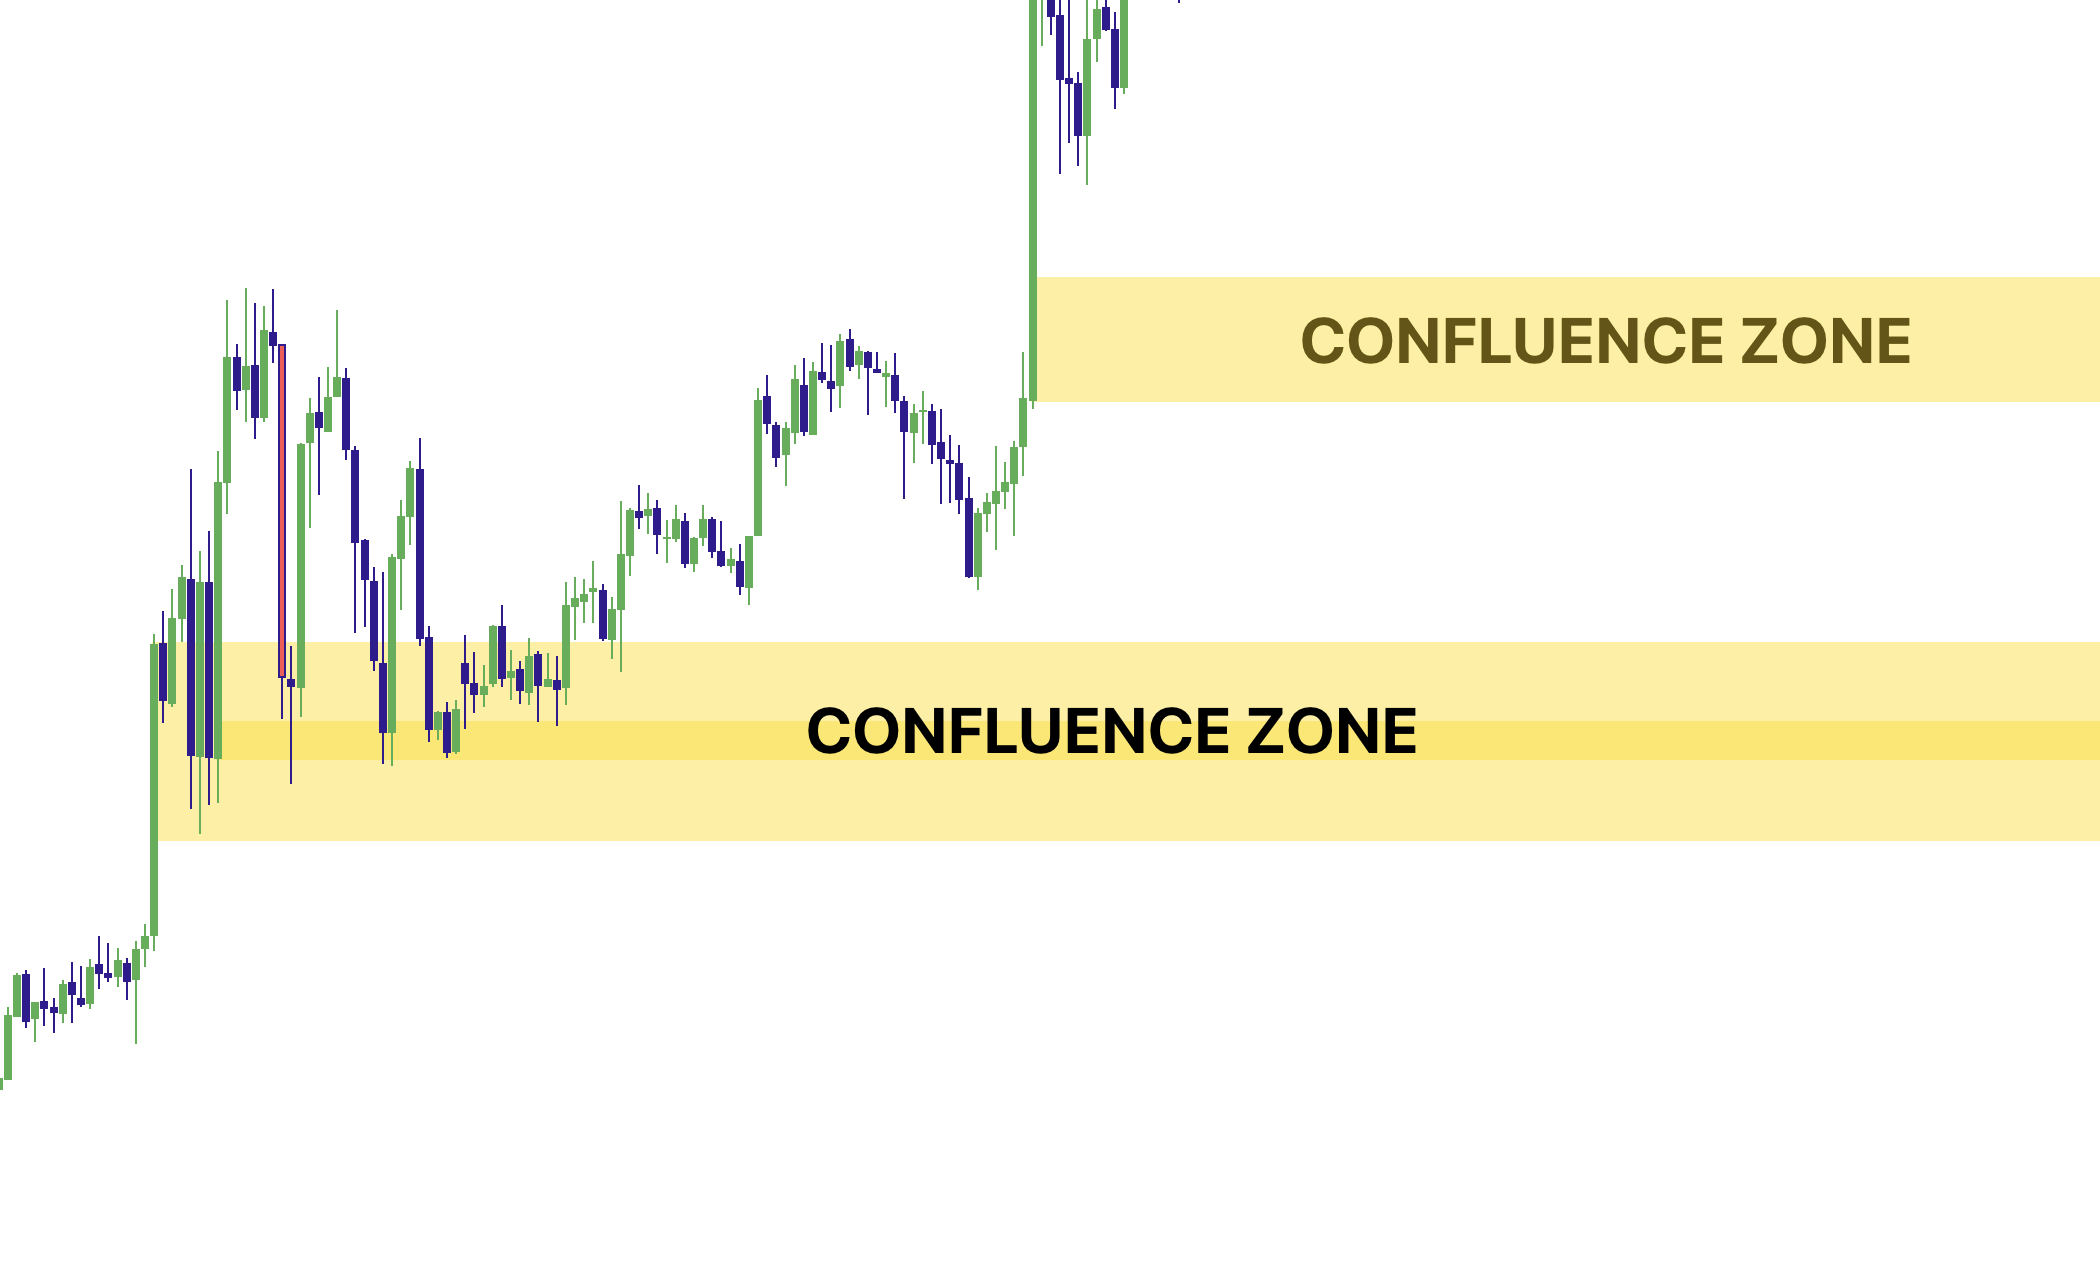
Confluence zones highlight where a new impulse displacement overlaps an existing active FVG. This creates a useful same-move stack: momentum footprint + imbalance occupying the same region.
Why confluence matters
Confluence matters because a zone formed by strong expansion and imbalance is usually more informative than a random mid-range level. But remember that the impulse and FVG can come from the same move, so the strongest setup also adds independent context such as major liquidity, trend, session structure, or clear rejection on the retest.
Example 6: Confluence zone prints (fill only, border hidden by default)
The Right Way to Trade It: Context First, Trigger Second
Momentum Gaps is not a buy/sell button. It is a location engine. Once price reaches a zone, first decide whether the market is rejecting it, defending it, or accepting through it. Then use an execution tool—like Elev8+ Reversal triangles—only when the signal agrees with the behavior already occurring at the level.
The rule
Momentum Gaps + OBs = precision location. Elev8+ Reversal = confirmation. Prioritize reversal triangles or LS signals when they print inside a zone that has already shown rejection or defense, rather than entering simply because price touched an impulse, FVG, IFVG, confluence zone, or order block.
Two Core Playbooks (with Elev8+ Confirmation)
1) Retest → Rejection → Confirmation (reaction playbook)
- Step 1: A clean impulse/FVG/OB/confluence zone forms from meaningful price expansion.
- Step 2: Price moves away and establishes separation from the zone.
- Step 3: Price re-enters the zone at a location where a reaction makes structural sense.
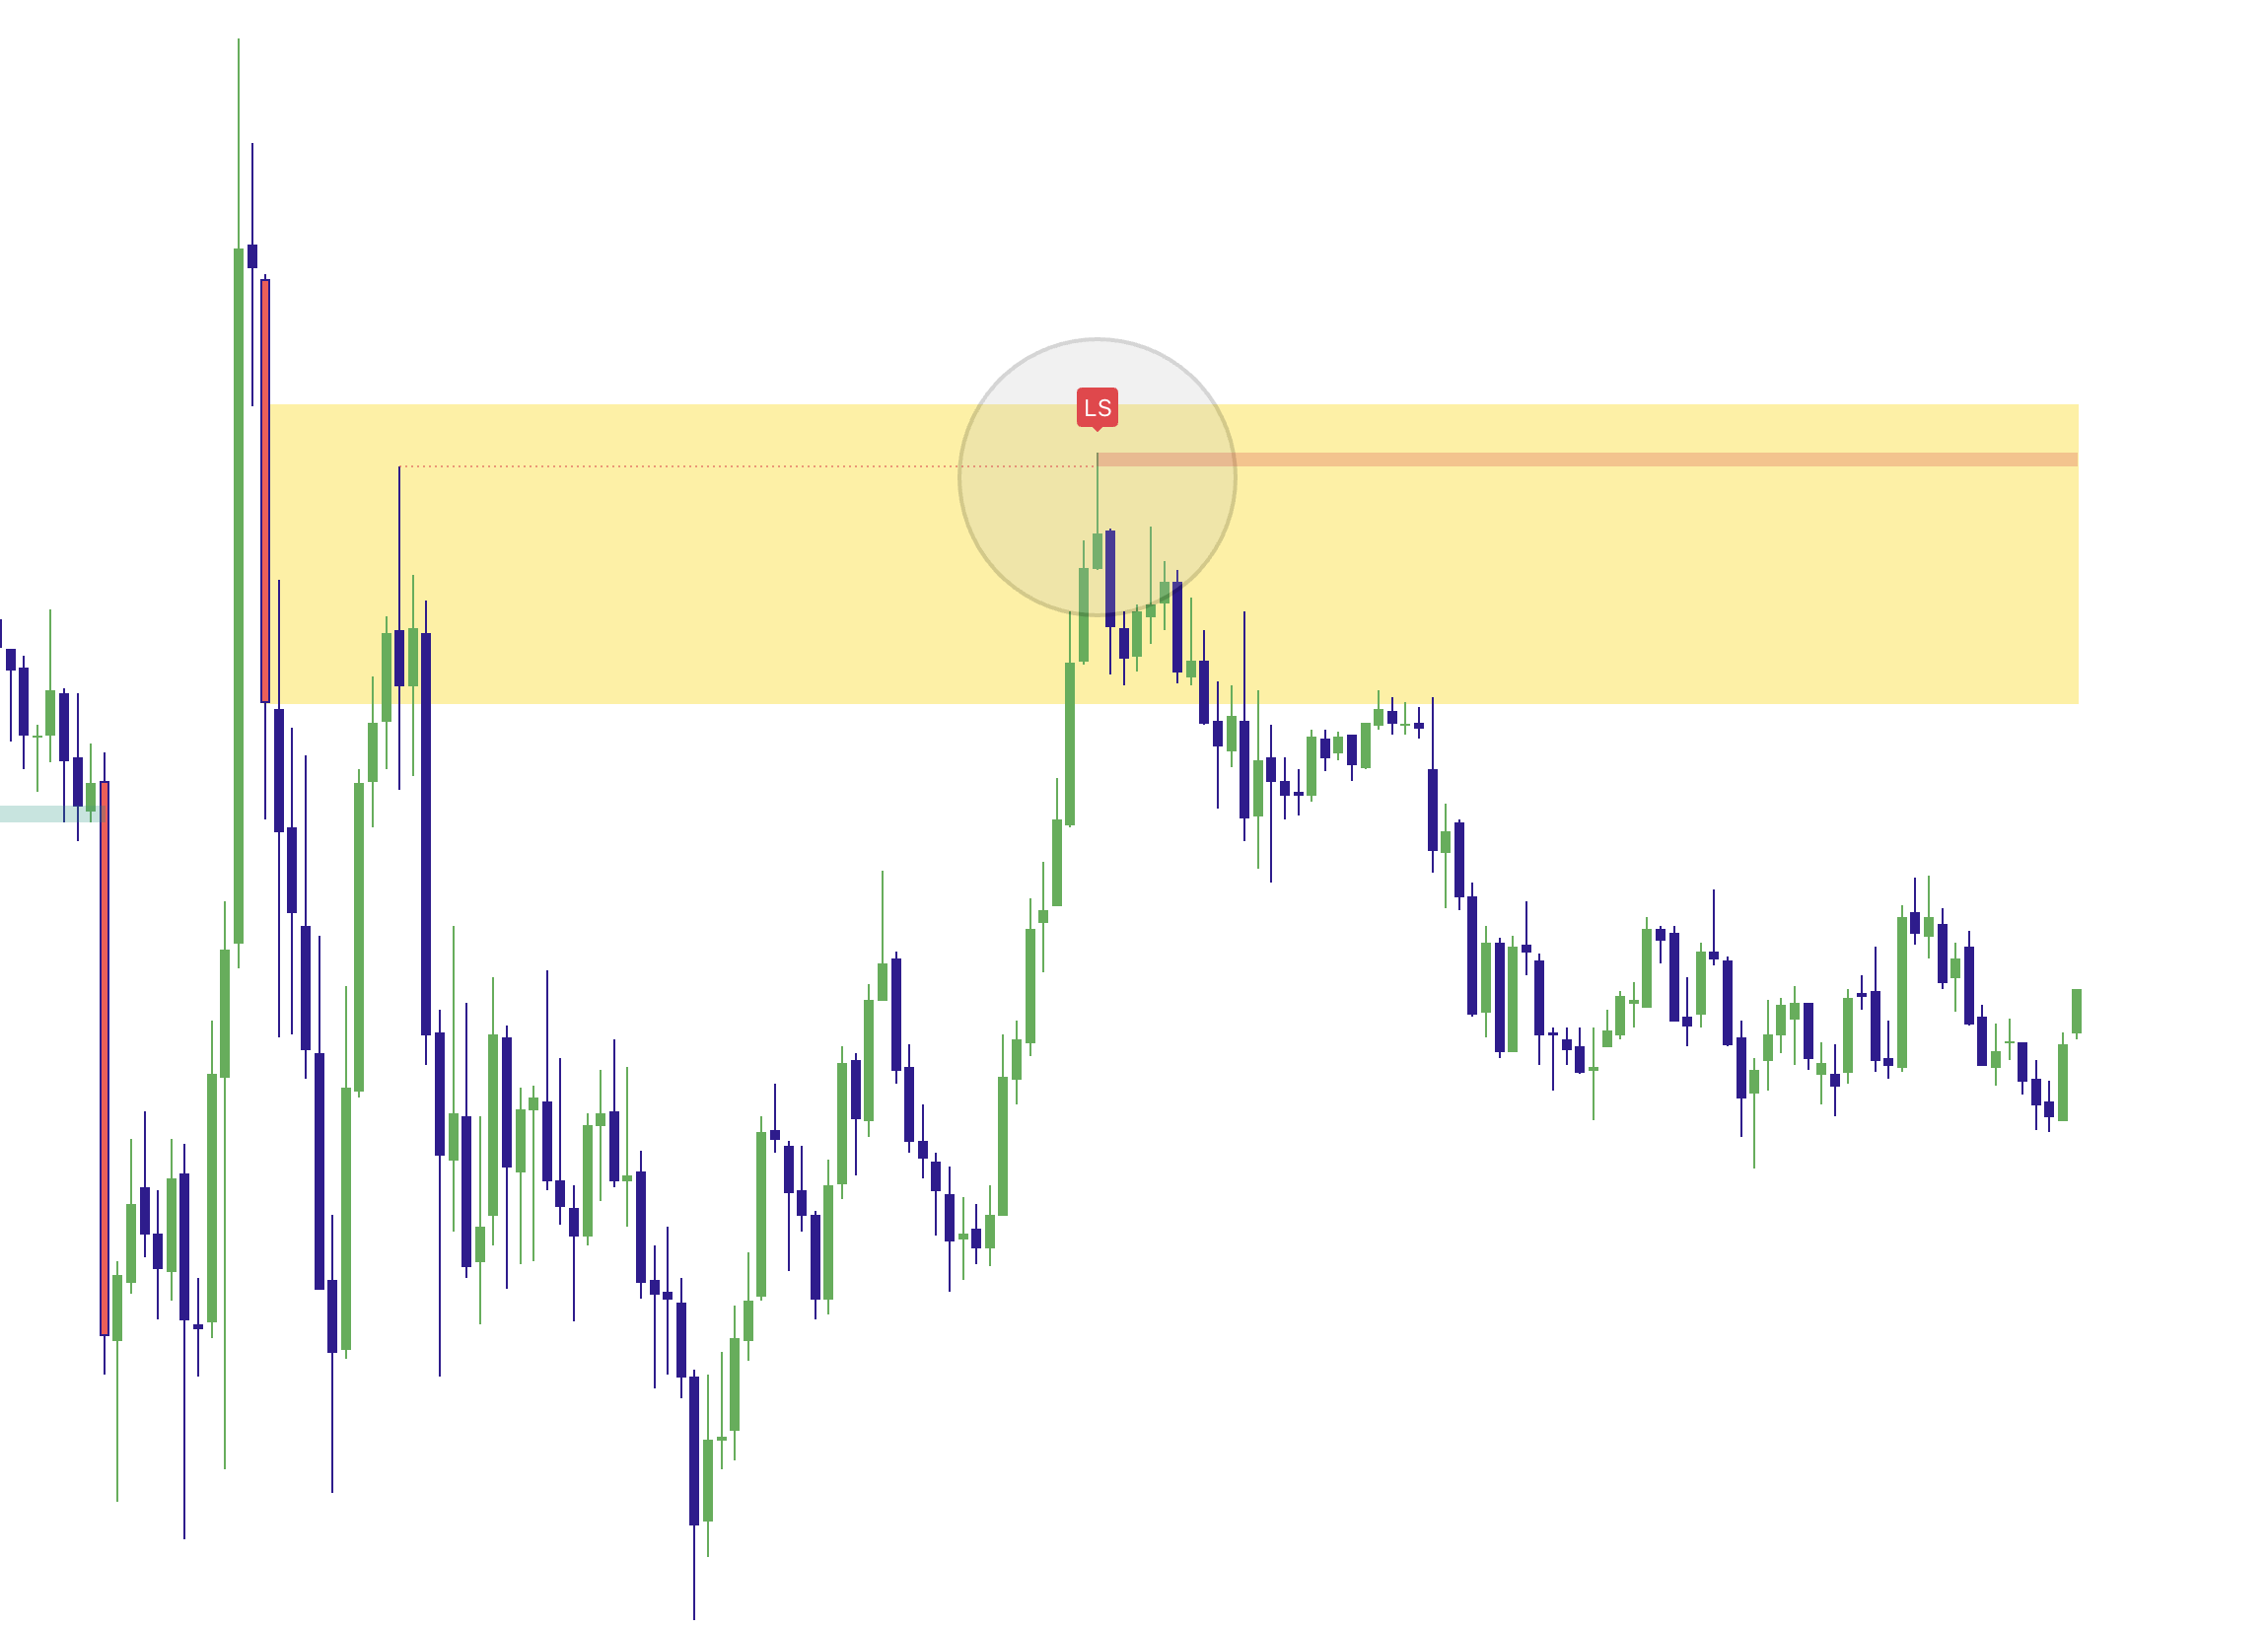
- Step 4: Wait for rejection or failed continuation + an Elev8+ Reversal triangle.
- Step 5: Define invalidation beyond the structure that makes the setup valid, not in the middle of the zone.
Example 7: LS signal triggers inside stacked context
2) IFVG Failure → Flip → Retest
- Step 1: An FVG forms and initially acts as active structure.
- Step 2: Price closes fully through it → the original FVG fails and becomes an IFVG (purple).
- Step 3: Price later revisits the failed gap from the opposite side.
- Step 4: Use rejection from the flip area + an Elev8+ Reversal triangle for execution.
Example 8: IFVG flip + later retest with a reversal trigger
Alerts (What You Can Automate or Monitor)
Momentum Gaps includes alert conditions so you can monitor when structure forms or when price returns to an existing zone without staring at the chart all day. The alert identifies the event; you still evaluate the surrounding context and price response. Useful alerts include:
- Impulse Created (new displacement candle)
- Impulse Zone Re-Enter (price re-enters an impulse zone)
- FVG Created (new bullish or bearish FVG)
- FVG Re-Enter (price re-enters an active FVG)
- IFVG Created (FVG closed through and flipped)
- Confluence Created (impulse + FVG overlap prints)
- Confluence Re-Enter (price re-enters a confluence zone)
- Bullish OB Created (new bullish order block)
- Bearish OB Created (new bearish order block)
Momentum Gaps Checklist (before you take a zone trade)
• Decide the setup first: reversal/reaction or continuation/retest.
• The zone is clear and sits at a location that matters, not random mid-range space.
• Price is retesting the zone; you are not chasing the original impulse candle.
• Price behavior confirms the idea: rejection/defense for a reaction or acceptance/hold for continuation.
• Elev8+ Reversal triangle or LS confirmation agrees with the behavior already visible at the zone.
• Invalidation is defined beyond the structure that makes the trade thesis valid.
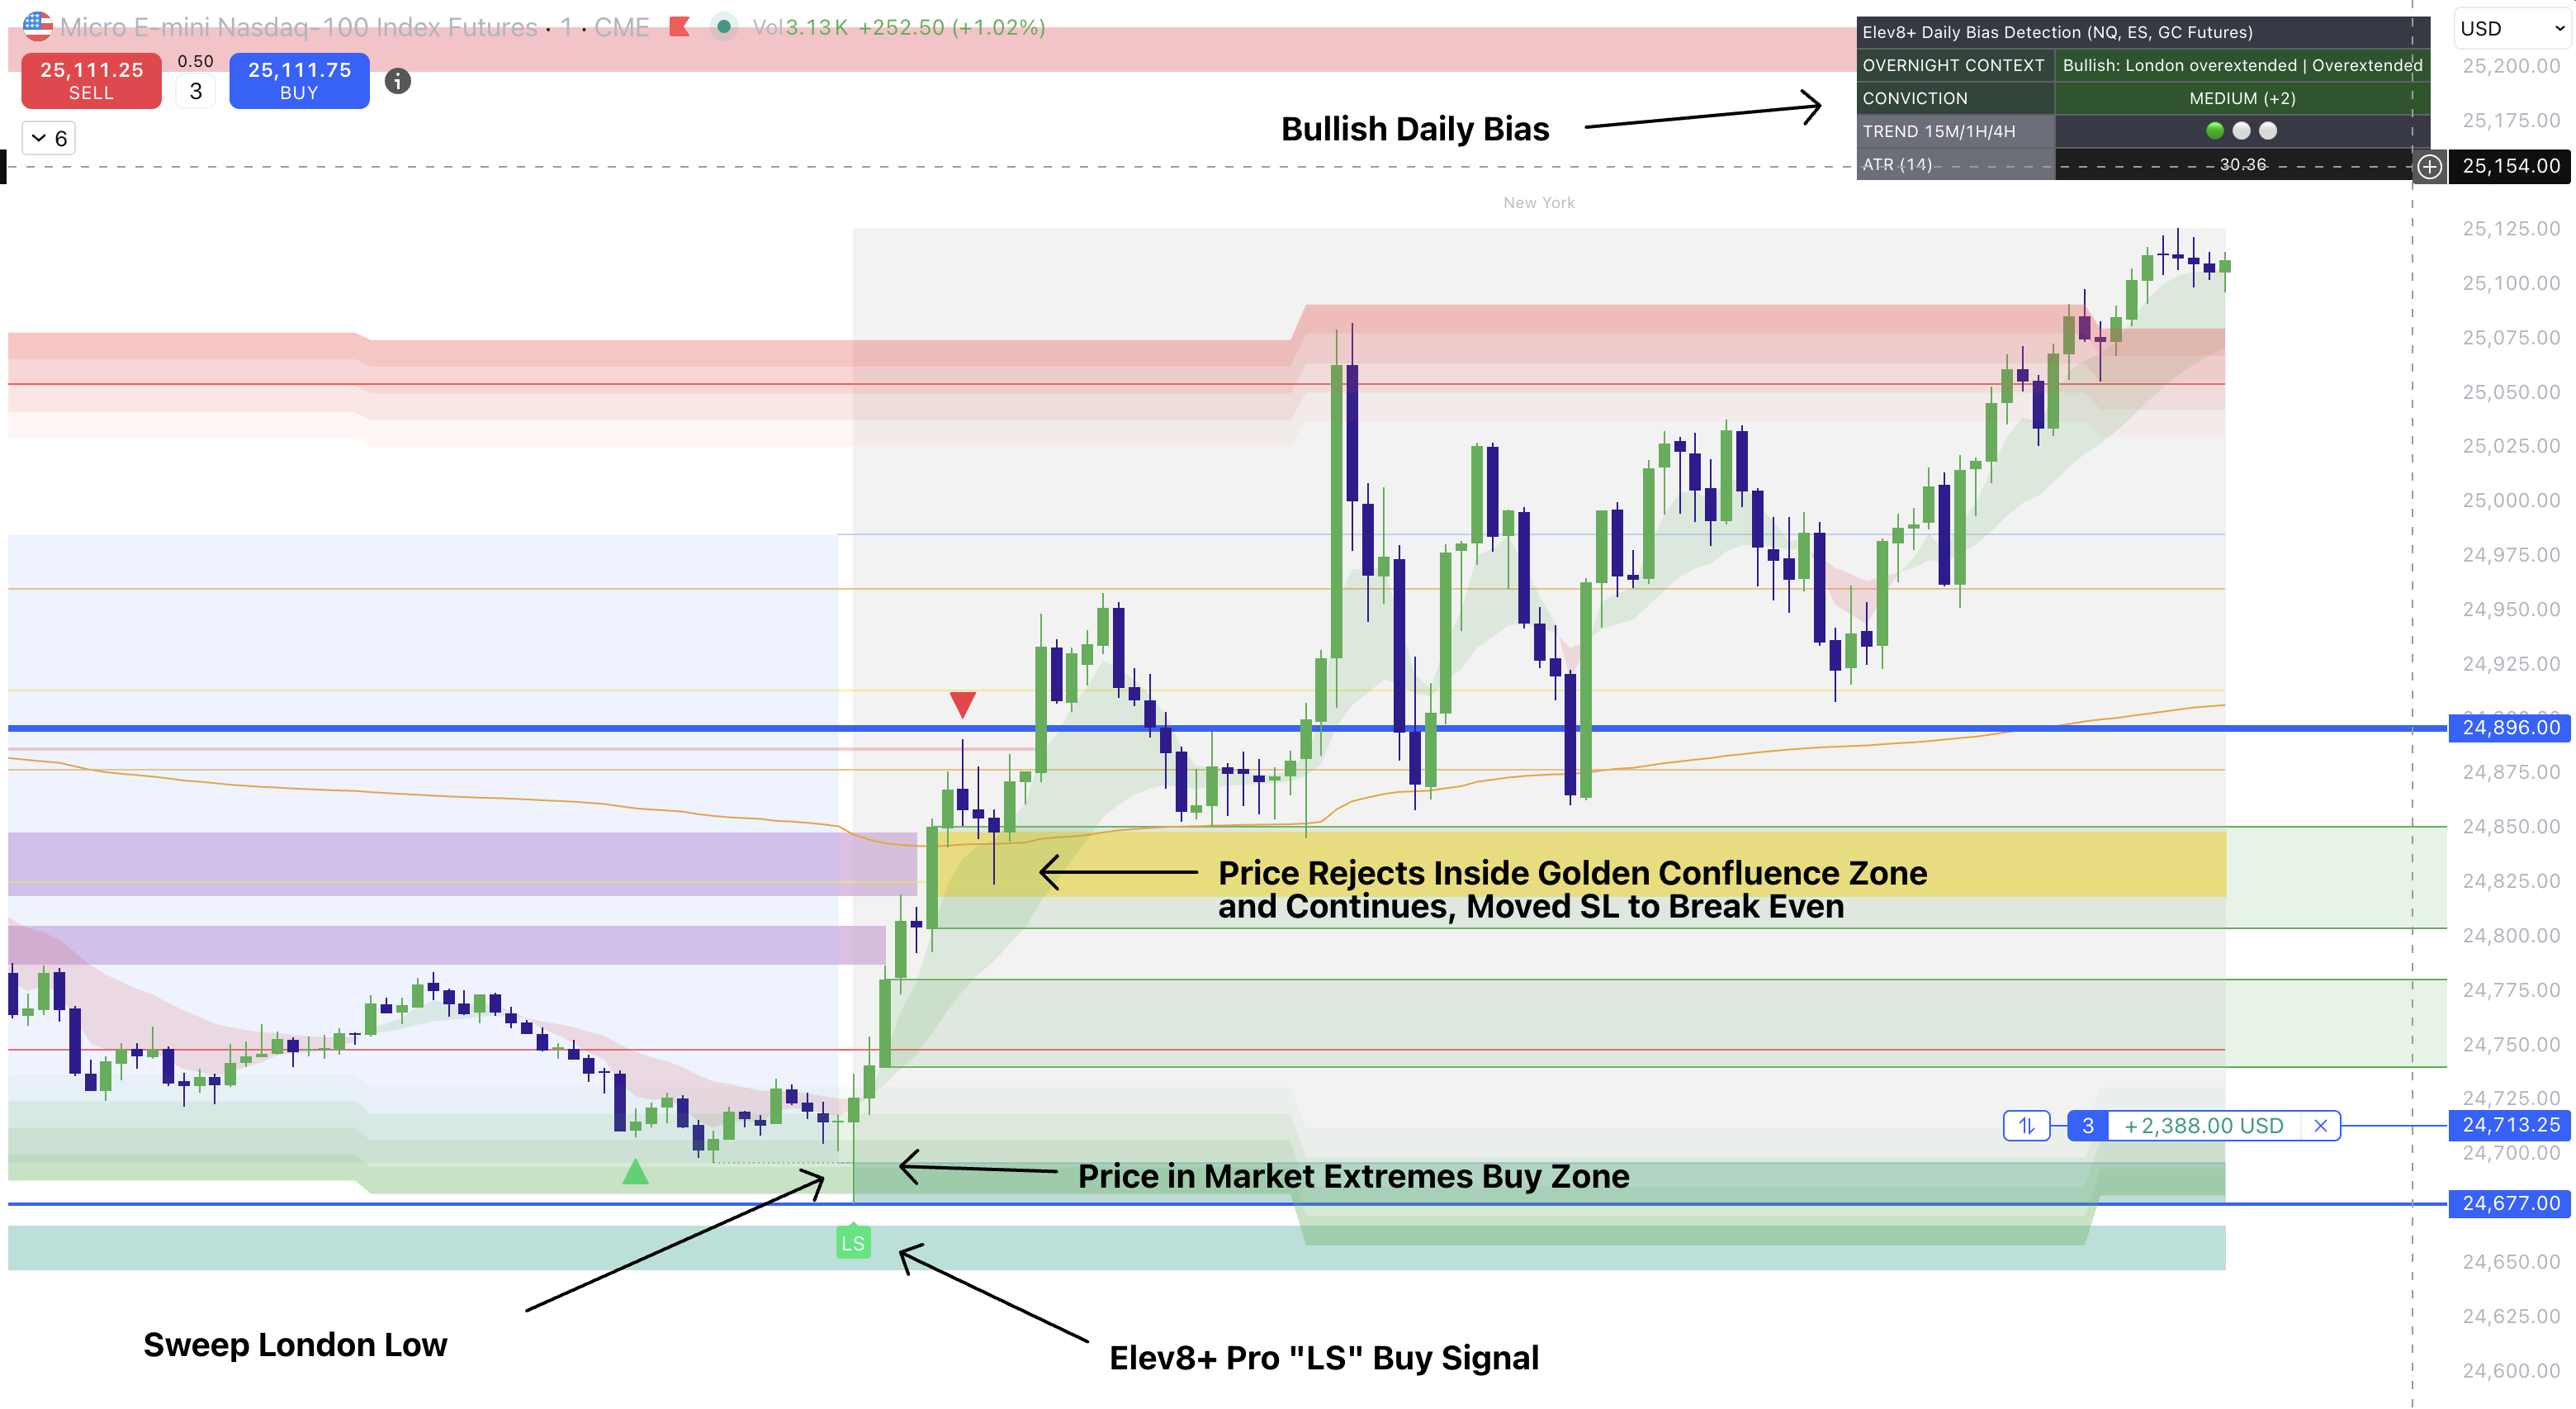
Example: Price sweeps the London low and then prints an Elev8+ LS confirmation signal. The move higher creates a Golden Confluence zone. When price later retests that zone and continues to defend it, the zone can confirm that the original bullish structure remains intact and provide a logical reference for managing the trade.
If you cannot explain why the zone matters, what price must do there, and where the idea fails, you do not yet have a complete zone trade.
Common Mistakes (and the Fix)
- Mistake: Treating zones as auto-entries. Fix: zones tell you where to evaluate; price behavior and confirmation tell you when.
- Mistake: Chasing the impulse candle. Fix: let displacement create the structure, then wait for a controlled retest.
- Mistake: Treating every overlap as independent confluence. Fix: Impulse + FVG can come from the same move, so add independent liquidity, trend, or session context.
- Mistake: Ignoring acceptance through a zone. Fix: if price closes through and holds beyond structure, stop forcing the original reversal thesis.
Want to trade displacement zones with a clearer framework?
Use Momentum Gaps to map displacement, imbalance, failed gaps, and order block zones, then use Elev8+ Reversal triangles as your execution confirmation. This combination helps you separate location from timing, distinguish rejection from acceptance, and define risk around the structure that actually makes the trade valid.
Indicators and examples are for education only. Always define risk and trade only what fits your plan.
Quick Checklist
- I can identify displacement, impulse zones, FVGs, and overlap areas.
- I can distinguish meaningful imbalance from ordinary chart noise.
- I can use gaps for confirmation, retests, targets, and structural invalidation.
What Invalidates the Setup?
Stand aside when meaningful location, the expected price response, confirmation, clearly defined structural risk, or a realistic target is missing. A tool or signal by itself does not complete the trade thesis.
Common Mistakes
- Using every available tool on every setup.
- Treating a plotted level, zone, alert, or label as an entry by itself.
Next Recommended Lesson
Elev8+ Reversal Blocks: CE Reaction Zones, Liquidity Sweeps, and High-Probability Pullback Entries →